Hiya guys! Happy Friday! TGIF!!! Whoo hoo! I am so glad the weekend is here! It's Super Bowl weekend and even though the hubby and I don't really have anyone to hang with, we decided to throw a little Super Bowl party of our own! I am so excited! I am going to make some yummy game day food and just to get to hang with the hubby will be fabulous! Let's keep our fingers crossed that he won't get called in to work! LOL. Other than that, we don't really have anything big planned for the weekend. I'd like to get out of the house though. I purchased some new curtains for our living room/scrappy space and I need some of those decorative tie backs. So I am hoping we can go loafing and find me some. We will see though.
Anyways, as y'all already know Brandon and I recently moved out of our teeny tiny shoebox of an apartment and into a new home. We LOVE it and although there is still a lot to be done, I am happy to report that I have my scrappy studio set up. We are using one of the bedrooms as a den where we can hang and watch tv when we are chilling, so we decided to set up my scrappy studio in a corner of our living room. It had some great built in's in one corner and it was perfect for my scrappy space. I do have a tv in here and am planning on buying a nice, comfy chair and ottoman combo to put next to the tv. This will be my own little sanctuary in the house. And although this is the first thing you see when you walk in the door, I'm ok with it. No one ever really comes to see us since we live so far away from family and I have it neat and tidy, so I am very excited.
Now, my scrappy studio is not fancy schmancy like many that I see in magazines, but I still am very proud of it. It has taken me almost 5 years to collect all of my stuff and although it doesn't all match, I feel very blessed with my space! I hope you guys will like it, so here we go...(this might be the longest blog post I've ever done...LOL)
(Note: click on any of these pics to see them bigger if ya need.)
This is the view of my scrappy space from the corner of the living room where the tv is. I have my desk facing away from the built in book case/cabinet on the far wall. I am planning on purchasing a small swivel chair and mat so that I can push away from my desk and turn around to access the things in the book case/cabinet. I see a trip to IKEA in my future! LOL
Now, here is the view as you walk in the door (that's my kitchen/dining area in the background). I used 2 of my desks to make a 'U' shape in front of the desk that I work at. On the left, is my $7 dollar retro table I picked up at the Salvation Army. I keep my sewing machine on the top and all of my sewing notions in the drawers. I have plans to paint this white...one of these days. Then on the right, I have a computer desk that I keep my laptop, pens, pencils, and my Fiskars Rock, Paper, Trimmer on top of. This 'U' shape really helped me to maximize all of my storage. I think I have something tucked neatly inside each nook and cranny in this space! LOL
Here is the sewing desk I mentioned. I placed my altered wire dress form I made last year on top of the desk. I purchased the sewing machine cover and matching basket through a mail order catalog.
Here is the white computer desk on the right. Since I have a laptop, I don't use the little shelf that slides out for a keyboard. Instead, here is where I place my calendar that I use to keep up with due dates and the folder where I write down my supply lists for projects I create...very handy when it comes time to submit. I also keep the odd notes here. Then on the right (on the bottom), there are 2 shelves. Inside of these shelves, I have placed 2 locker bins that I purchased at my local Dollar Deals store. The top one is for patterned paper scraps and the bottom one is for solid cardstock paper scraps.
I pulled out one of the locker bins I mentioned above so you could see. Inside each bin, I have those little file folder pockets. They are like a file folder but are closed up on 3 sides, hence the pocket. These are perfect for your paper scraps. After many failed attempts at organizing my paper scraps, I found this solution about 2 years ago and it has worked perfectly!!! I love it!
Here is the top of my desk. The 'Life Is Good' book is a calendar book just for quick reference of the date. Then I have a little coaster box I made that holds all my pens, pencils, highlighters, etc. Then the little plastic storage thing holds scraps of paper I use to write quick notes on. As you can see, got the 'Twilight' love going on with my laptop sticker. LOL.
Here is my basic paper tower. I purchased this at Hobby Lobby. The cover that came with the tower slides down over the tower, but I found taking this off and putting it back on every time I scrapped to get on my nerves. So I took my scissors and very carefully cut up the sides of one of the panels. Now, all I have to do is lift up the front panel and fold it at the top to reveal my paper. Then when it's time to close up shop, just let it back down.
My Cricut Expression found a home on a cabinet that was originally intended for closet storage. I picked this up at K-Mart on clearance. It's perfect for my scrappy space. Now, I'm not sure if you can see or not, but on the left side of the cabinet (between the gap) I have placed one of those Command hooks. My Cricut mats are hanging on this hook. Under the Cricut Expression are shoebox bins that hold various embellishments like flowers, ribbon on the spool, felt, fur, chipboard, die cuts, etc.
Can you tell I purchased a new toy (a Dymo Label Maker) this weekend?! LOL. My Mom said I'd be labeling the whole house before you know it. If you know me, you know I am a big labeler. I'm very OCD about stuff like that, but I can't help it! LOL. My hubby just laughs and puts up with it, but I think he secretly enjoys the fact that I label! :)
This cabinet was purchased with my craft desk. I paid about $100 for it. It was originally $200, but this one was the display at a local store. It has a few boo boo's, but hey, it works. I keep my Purple Cows Trimmer, Purple Cows Freestyle Mouse, and Cuttlebug on top. I'm contemplating labeling these drawers too...tee hee!
On the right, a door opens to reveal Cricut cartridges/Cri-Kits pens on the inside of the door. On the shelves I have: vinyl, Cri-Kits embossing supplies, Cuttlebug Embossing folders (in a binder) and Cuttlebug Embossing supplies, clear stamps (in another binder), and my scrappy trash can bags.
(And a note to my Mom when she reads this....do you notice anything?!!! Giggle!)
(And to let you guys in on what she should be noticing, do you see the charger plate on the counter top at the top of the picture? My Mom made this and gave it to Brandon and I for Christmas. Isn't it cute?! She makes the cutest stuff for our home!)
Top Drawer of the cabinet: stamping and embossing supplies.
Next Drawer: markers, crayons, watercolor, chalk, thread, craft wire, paint brushes, etc.
Third Drawer: Esmerelda (that's my Cricut Gypsy) has a 'condo' of her own! LOL!
Bottom Drawer: this kind of evolved into my 'catch all' drawer. I have a little bit of everything in here: paper bags, stamped images from swaps, card bases, photo cd's, etc.
Now, here is the view of the desk I work at. I bought this desk at a local discount store for about $170 and it has been worth every penny!!! I love this desk! It has 2 doors on the top that open up to reveal storage inside and a drawer in the center.
I keep my Cuttlebug on the cabinet I mentioned above. I keep it on a glass craft mat. I find it suctions better to the glass mat.
Cork/Dry Erase/Magnetic board where I keep letters, notes, business cards, etc.
Button storage on my desktop. I purchased this through a mail order catalog for like $5. I have my buttons assorted by color in here. It swivels around.
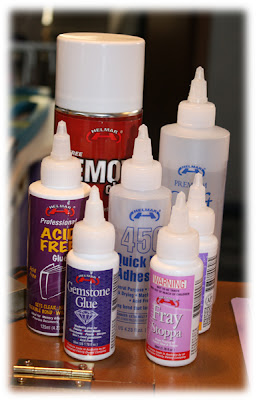
Of course, what is my desktop without all of my favorite Helmar Adhesives on it? I keep these so they are right at hand whenever I need them. Y'all know I love my Helmar!
My Fiskars tool caddy on my desktop. I keep my scissors and all other crafty tools I need right at hand in this.
Also on my desktop, spray inks.
(please excuse my temporary curtain tie backs in the background back there. LOL. I improvised until I could go to purchase some and used leftover lace and thumbtacks!)
Oooh, and looky at what else my Mom got me! It is the CUTEST little fabric folder that holds a memo pad. I LOVE this! I'm going to keep it on my desktop to write articles, write to do lists, etc. The pink and green inspired the new color combo I am going for in my new space!
My craft mats and trimmer. As you can see, the mats are well used. They are looking worn, but that means they are loved, right?! LOL
Here is the left side door of on the desktop. It lifts up and inside I keep my Helmar Zap Dots and Helmar Liquid Scrap Dots. I keep scrapbook kits at the far back.
Here is the door on the right side of the desktop that lifts up. In this one I keep all of my Stickles glitter glue, craft paint, stapler/staples, rhinestones, pearls, brads, eyelets, misc. embellishment.
Drawer on my desk right under where I work. In here I keep my markers, pens, I-Top, Crop-A-Dile, I-Rock Tool/supplies, Creative Memories Cutting System, and a few other odd embellishments.
Next to the cabinet where I keep my Cuttlebug and trimmer, I have placed a plastic cabinet that holds all of my rubber/foam stamps. I got happy with the new label maker on this thing too! :)
Here are a few drawers pulled out:
Now, I told you I utilized every nook and cranny, this is under my desk on the right side. Here I keep my scrappy trash can (which has a story), sticker bins, and another plastic cabinet for supplies.
Let me tell you the story behind the trash can. I am always asking my husband to bring me little surprises. I surprise him all the time with stuff and I like him to do the same. Not big stuff, just little stuff to make each of us smile. Well one day he came home with a trash can! He had noticed me working at my desk and my old, ratty trash can. The old one had stickers, ink smudges, etc. all over the inside and outside. So he went and bought me this one. It has special bags that go inside and you fold the bag over this inner seal. Then it has a top that snaps on so that the bag stays on. So now when I throw stuff away, it goes in a bag and my trash can stays nice and pretty! Wasn't that sweet of him?! But I do joke with him about it now...I tell people he surprises me with trash cans! :)
In the red cabinet I have recipe books/recipe cards from swaps, tape dispenser, chipboard sheets, alterables, I-Top supplies, and plastic bags.
On the right side under the desk, another plastic storage cabinet. On the bottom, a whole drawer dedicated to mainly American Crafts Thickers...yep, I have an obsession for those. In the other drawers I have silk flowers, odd stickers. feathers, etc.
Next to the desk, I have these little thingies where I keep small scraps of ribbon. I purchased these at a office supply store that was going out of business for like $5 a piece. They work great.
Now, behind my desk, I have the built in shelves I mentioned at the beginning of this post. On the bottom, I have my picture boxes and all sorts of books/magazines.
Middle shelf....this is where I keep all of our Helmar Preferred Partner products that I design with when posting on the Helmar blog. We love our preferred partners!!! They rock!!!!
Now on to the top shelf. I have another Helmar shrine with all my extra goodies!
I also have my stamp pad shelf placed up here. I bought this on Etsy about a year ago for about $25 I think.
Oooh, and notice the pink picture frame to the far left?!! That was my steal at Big Lots yesterday! This picture frame weighs about 5 pounds and is so ornate AND was $6!!!! I plan on altering that today! So stay tuned! :)
Above the shelves is 2 doors. When you open the doors, I have placed all of my punches in shoebox bins and labeled them (again, getting happy with the label maker!) I also have placed my PC laminator and Zutter Bind-It-All. Now, you can't see it, but behind the bins on the left, I have all of my PC laminator Hot Pockets hanging on a hook.
And still going with the new pink/green theme...some wall art.
Whoo! That's a long post! But there you have it, there is my new scrappy space! I can't wait to get in here and start creating!!!! Yippie!!!
As always, thanks for stopping by my blog! Have a fabulous weekend!!!
Happy Scrappin'!


11 comments:
Aymee, this is absolutely fabulous!! So happy you guys got out of that tiny apt. And your collections of scrappy goodness is amazing.. So pretty girl!!! You did a great job!!!!
I think it looks great...so organized! I must admit, I can never keep mine looking that neat. :-)
Oh my goodnes I went from a voyer to the GREEN EYED MONSTER looking at this AWESOME space. That's it you must come to Alabama - HELENA this time and take over and organize my space! I will give you a room to stay in while you are doing it, ok? ENJOY this wonderful space GF!!!
OMG!!!
I only wish I had scrapping space like that.
I'm sooooooo envious!!!!
Love it xx
Aymee,
Congrat's on you new home. I love your new scrap space. The cabinets and the other storage. It's nice to have a space to work at, tht's so organized. You go Girl!
Aymee I love your blog. Your space is so organized...
Thank you everyone! :)
WOWZA!! Your room is seriously amazing... I wish mine was that organized! Beautiful work!! Enjoy it!
Wowsers!!!
I love it Aymee! I can't believe how compact everything is with all the things you have.
You did a great job! Now....I need to get mine back to being organized!
Love it, love it, love it!
OMG girl you are so organized!!! I thought I was, but you knock me out of the water!!! Looks great! Hope all is good with you!!
Now let me fly out out here and see if you can do it for me =-)
Post a Comment