A Scraphappy Southernbelle

Thursday, April 28, 2011

Lots Of Love

Happy Thursday Everyone! For me, the weekend is here! Yippie! I am excited and a little sad today. Today is my last Helmar DT Blog Post! It has been such an honor to work for Helmar and to get to know all of  my fellow DT Members! Each one of them are so talented and so sweet! It is an experience that I will cherish forever. I would like to thank Tracy, Mark, and everyone at Helmar for everything! You guys have been so good to me and I wish you all the best! But all good things must come to an end, right? But not completely because I will still get to shout the word of Helmar all over acting as a Helmar Adhesive Ambassador. So although my role has changed, I am still so excited to see what the future will hold!

So I thought I would create a card for all my buddies at Helmar for my last post. This card is sending them all 'Lots of Love'!!! I love all of you guys!! And as we say, "Once a Helmar girl, Always a Helmar girl!!!

"Lots Of Love"
Supplies Used
Cardstock: The Paper Studio, Core'dinations
Patterned Paper: Pink Paislee
Alphbet Stickers: American Crafts, Cosmo Cricket
Ribbon: Offray, Chatterbox
Mini Clothespins: Canvas Corp.
Glitter Glue: Stickles (Ranger Industries), Fruit Punch
Embossing Machine: Cuttlebug (Provo Craft)
Embossing Plate: Sizzix (Ellison)
Electronic Cutter: Cricut (Provo Craft)
Electronic Software: Sure Cuts A Lot (Craft Edge)
SVG's: My Scrap Chick (Jillibean Valentine)
 Love these little clothespins from Canvas Corp. I decided to use them a bit differently and turn them sideways instead of clipping them on.
 Isn't Miss Jillibean adorable?!! I love the Jillibean files from MSC. If you are interested, HERE is the link to them. You'll have to scroll down a bit. AND they are having a sale!!!
 I used Zap Dots to pop Miss Jillibean up for added dimension.
As always, thank you for taking the time to stop by my blog! I hope you all have a phenomenal weekend!!! See you soon! Happy Scrappin'!
Pin It!

Wednesday, April 27, 2011

Family

Hi guys! Here is Layout #2 for the day that I promised. As you know, these are going into an album celebrating a new baby girl! For this page, I wanted to focus on their new family and baby makes 4!

"Family"
Supplies Used
Cardstock: The Paper Studio
Patterned Paper: The Paper Studio
Alphabet Stickers: American Crafts
Rhinestones: Queen & Co
Die Cut/Embossing Folder: Cuttlebug (Provo Craft), Butterfly
Corner/Border Punch: Martha Stewart Crafts
Adhesive: Helmar Quick Fix Adhesive Runner, Helmar Premium Craft GlueHelmar 450 Quick Dry Adhesive

Aren't they just an adorable family?!!!
 I added some rhinestones to the alpha's to bling them up a tad. All patterned papers were chosen by the lady I am creating this album for.
 The proud big sister! She is just so cute!
Ok, back to the scrappy desk I go! I'll see ya tomorrow! I have my final Helmar Design Team blog post going up! It has been such a wonderful ride and I am so blessed! But I'll be continuing on as a Helmar Ambassador, so I will still be shouting my love of all things Helmar! LOL! You know I love those adhesives!

Thanks for stoppin' by! Have a fabulous day!
Hugs!
Pin It!

It's A Girl

Hi Everyone! Happy Hump Day! I can't believe it's already mid-week! Another week flying by! I have a new layout to share with you today. I am so excited about this page and the ones to follow because they are not for me! I have been asked to create this album for someone else focusing on their baby girl! I am just thrilled to be scrapping for someone besides myself! It is such an honor and I sure hope she and her family will enjoy the album when I am finished. This will be the first page of the album.

"It's A Girl"
Supplies Used
Cardstock: The Paper Studio
Patterned Paper: The Paper Studio
Die Cuts (bird border, journaling spot, photo corners): Carolyn Gavin (Hobby Lobby)
Glitter Glue: Stickles (Ranger Industries)
Thread: Coats & Clark
Rhinestones: Queen & Co
Punch: EK Success
Electronic Cutter, Cartridge: Cricut (Provo Craft), New Arrival
Sketch: Liz Qualman
Other: sewing machine

 This is where the new mom can journal her thoughts...
 It's a baby girl, so have to add a little sparkle!
I will have Page Two of the album going up this afternoon and I will be sure to share all of the other layouts with you as I finish. AND I am doubly excited because I have not one, but two orders in! I also will be working on some Disney stuff for another lady. I plan on alternating between the two so I can finish them around the same time. Each of these albums will go to coworkers at the same school in Alabama and I would like to let them receive them at the same time. So here's to scrappin'! I'm going to be a busy bee but am thrilled!

As always, thanks for stopping by my blog! See you this afternoon!
Happy Scrappin'!!!
Pin It!

Tuesday, April 26, 2011

Let's Get Ready To Rock!

Hey guys! Happy Tuesday! I hope you all are having a great morning so far! I have a new project I'd like to share with you today. First, let's just say this is WAY out of my normal scrappy element. I prefer to stick to frills, lace, and bold colors, but for this project, it just ain't happenin'! LOL.

Let me give you a little background before I go into this project. Are any of you familiar with the term 'man cave?' I know it is becoming quite popular these days for the men in our lives to have their own room. Well, since the hubby gave me the biggest room in our new home for my scrappy studio, we decided he should finally get the man cave he has always dreamed of. And to be honest, this scared me to death! I am very shabby chic in our home's decor' and Brandon is a total opposite. But I made a promise and I said he could design it any way he wanted to. Brandon loves music and is learning to play the guitar so he decided he wanted a 'rock and roll' themed man cave. So we first chose the one thing every man cave needs, a big, comfortable couch! Here is our brand new couch! And although it is not in my personal tastes, I have to say it's definitely growing on me! This thing is soooo comfy and there's plenty of room to just hang out and veg!
So visualize that in his 'man cave' with a bookcase, 2 entertainment cases for cd's/dvd's/etc., and a entertainment center. After we had all the furniture in, we turned our attention towards the walls. Well, of course Brandon had to hang his dart board. He also bought a piece of really nice 'Beatles' mirrored artwork. Then we had the idea of me making him something! I was so excited! I figured he would not want my touch on any of the room, but I just knew I could come up with something for him. I wanted to totally blow him out of the water and surprise him. He is always so sweet to compliment my dainty artwork and I just wanted to do something completely opposite. So I have created 2 canvases.

I purchased these 16x20 canvases at a local bargain outlet for $2.99 each. I began by painting on a layer of black paint. I then used one of my favorite mediums, the Helmar Crackle Medium. This stuff is so awesome! I painted on the mediums as per instructions. Once dry, I rubbed my silver ink pad over the top and then wiped it down with a cloth. This allowed the silver ink to get into all of the nooks and crannies that the Helmar Crackle Medium left behind. I then also distressed up the edges with the same ink. Next, I found some free vector clip art online and pulled it up in my Inkscape program. This allowed me to turn the picture into a SVG file, which could then be cut on my SCAL software by my Cricut Expression. After cutting the artwork, I adhered it and sealed the canvases with 3 layers of sealant. Last, Brandon chose the black chain to hang them with. So it was nice to have a little of both of us in these pieces. Again, TOTALLY out of my element, but I must say, it was fun to change things up a bit and he adores these! I am a happy gal!

Supplies Used
Paper: The Paper Studio
Pearls: Queen & Co
Ink: Stampabilities
Paint: Plaid
Die Cutting Machine: Cricut (Provo Craft)
Software: Sure Cuts A Lot (Craft Edge), Inkscape
Font: VTKS Tattoo (found at Dafont.com)

Canvas #1
I chose this font because it looked like something you would see on a rocker's tattoo. Then I wanted the circular pattern in the art to match the circular pattern on his couch. We chose the couch not only because it looked rockerish (is that a word? LOL), but because the circles on the pillows reminded us of records. I think I am going to make him a bowl to put on his coffee table that is made from a melted down record.
 Up close...
 Had to add some bling in there somewhere! Tee Hee!
 Canvas #2
I put the artwork for this canvas together out of 2 different pieces of art, a guitar and flames.
 Closer...
 Had to do a close up of the Crackle Medium effect...how cool is this stuff?!!! I love it!
And now back to the regular programming! LOL! No more rockerish stuff for me for a bit. I'm ready to get back to the sugar and spice and all that is nice! Ha ha ha!

Thanks for visiting my blog! Have a beautiful day!
Happy Scrappin'!!!
Pin It!

Monday, April 25, 2011

Exciting News!

Had to share this exciting announcement! As you know, I am so passionate about Helmar Adhesives! They have revolutionized the way I scrapbook and being part of their design team has been one of the best scrappy experiences I have ever been through! But it is time to bring in a new design team and I am sooo excited! I can't wait to see who the new team (and new guest designers) will be!!! Helmar is announcing it on the blog this week! So stay tuned! You can check out the Helmar blog HERE.

But in the meantime, today Helmar announces it's Adhesive Ambassadors!!! And I am so excited to say that I will be a Helmar Adhesive Ambassador!!! Yippie! I just had to shout my excitement this morning! And Congratulations to my fellow Adhesive Ambassador's as well!!!
I have a new post that went up this morning as well, so check below for some new scrappy stuff!
Have a fabulous Monday! Happy Scrappin'!
Pin It!

Pitchin' A Tent

Happy Monday All! I hope you had a fabulous Easter weekend with your friends and families! It was pretty dull around here. Brandon had to work so I spent the day alone, but I scrapped to keep me busy. Anyways, I guess you are wondering what I am thinking with that blog post title today, right?! LOL. It's a sad attempt at humor! I just couldn't think of anything else. I say 'pitching a tent' because today I wanted to share some 'tent cards' with you. I found the instructions for this cool type of card HERE  (or http://www.splitcoaststampers.com/resources/tutorials/tentcard/) at Splitcoast Stampers. I loved this tutorial! It was so easy to follow and these were put together so fast! I'd say I spent about 10 minutes on each card. So if you are need of some cards and time is short, this style of card is for you!

"Fresh & Fun"
Supplies Used:
Cardstock: Die Cuts With A View, The Paper Studio
Patterned Paper, Die Cuts: Imaginisce
Rhinestones: Queen & Co
Circle Cutter: Creative Memories

The instructions in the tutorial called for 'Spellbinders Nestabilities' dies, but I did not have any of these. So to create my circle cut out and the circle frame, I used my Creative Memories Custom Cutting System. You could also use a circle punch or your Cricut for that part if need be. Here is my finished card:
 See how the card is propped up like a tent? So cool! And it makes it so easy for the recipient to display  the card in their home.
 Love these die cuts from Imaginisce! Very summery!
 I chose to use white cardstock on the back of my card so that I could write my note here. I also stamped my personalized stamp from Cri-Kits on the back. I love adding that little personal touch to my cards! If you are in the market for a personalized stamp, check out Cri-Kits.com! They can make anything for you! You can even design your own!
 "Flower Card"
Supplies Used:
Cardstock: The Paper Studio
Patterned Paper, Flowers, Buttons, Sticker Embellishment: Making Memories
Rhinestones: Queen & Co
Ribbon: Ribbon FX (Hobby Lobby)
Circle Cutter: Creative Memories

For this card, I used lots of patterned paper and embellishments that have been in my scrappy stash forever! I am so glad I used up some older stuff! And the color combo of black/pink/cream is one of my faves! I decorated the back of this card in the same fashion as the card above.
 Up close of the Making Memories embellishments...
I hope you all have a fabulous Monday!
Happy Scrappin' to ya! 
Pin It!

Thursday, April 21, 2011

"Happy B*Day 2U" Card and Gift Bottle

Hey y'all! Happy Thursday! I hope you all are having a great week! I took about a week hiatus from scrapbooking....just needed some time off. I was not feeling the scrappy mojo at all. But this morning I woke up to the beautiful sunshine shining through my window and a soft breeze blowing outside, I knew it would be the perfect day to get back to scrappin'! So that is what I did! I have a very special friend who has a birthday coming up and I wanted to make a little something to send to her. Here is what I came up with:
 "Happy B*Day 2U" Card
Supplies Used
Cardstock: The Paper Studio
Patterned Paper: Pink Paislee
Alphabet Stickers: Kaisercraft, American Crafts
Border Sticker: Pink Paislee
Pearls: Queen & Co
Flower: American Crafts
Border Punch: Martha Stewart Crafts

This is a 5x5 inch easel card. I cut my base cardstock to 5x10" and then scored/folded at the 5" and 2.5" marks. Then I cut another 5x5" piece of cardstock for the card front. Easy peasy!
 I loved the sparkle these alpha's gave my card.
 This felt flower from American Crafts is for holding my card in the 'open' position.
 Of course I had to add a bit of dimension. I achieved this by popping up my alpha's and border sticker with my Zap Dots.
 Here is the back of the card where I will hand write a note to the recipient. I also stamped it with my personalized stamp I got from Cri-Kits.
 "Altered Bottle"
Supplies Used
Patterned Paper: Pink Paislee
Border Sticker: Pink Paislee
Lace Trim: Chatterbox
Bling: Queen & Co
Flowers: American Crafts

I began this project with a empty bottle I had in my scrappy stash. This bottle originally contained Prima Flowers. I saved the bottle because I knew I would one day want to alter it up. I began by altering the bottle with the most AMAZING product...the Helmar Crackle Medium! This stuff totally rocks! I brushed on Step One with a foam brush and let it dry for about 20 minutes. Then I brushed on Step Two and let it dry overnight. It turned out to be a great effect to add to the bottle. I love the texture it gave! Then I just altered it up with paper and embellishments. I filled it with some malted milk eggs for an extra splash of color.
 Can you see the crackle effect on the bottle? So cool!
That is all for me for now! Back to the scrappy studio to get to work! I have been hired to make 2 albums and I better get busy! Happy Scrappin' to you!

Have a fabulous weekend!
Happy Easter!!!
Pin It!

Thursday, April 14, 2011

"It's A Girl" Mini Album

Hey y'all! Happy Thursday! I hope you are having a fabulous week so far! I have a new post going up on the Helmar blog today and wanted to share what I created with you guys here as well. For full instructions and info on the adhesives I used, you can visit the Helmar blog at http://www.helmarusa.typepad.com/ if you'd like that info.

This project was inspired by a recent UStream class by my fellow Helmar DT Member, Becky. She showed how to use the Crackle Medium on acrylic and it looked so awesome, I had to give it a try!

"It's A Girl"
Supplies Used:
Paper & Coordinating Embellishments (Alphas, Die Cuts, Rub on's, etc): Fancy Pants Designs
Cardstock: The Paper Studio
Pearls/Rhinestones: Queen & Co
Ribbon: Michaels
Tulle: Hobby Lobby
Punch: Fiskars
Electronic Cutter: Cricut (Provo Craft)
Electronic Software: Sure Cuts A Lot (Craft Edge)
Album: Punky Sprouts

I created this album for a friend who just announced she was expecting a baby girl. I hope she and her husband will fill this with pictures of their baby and enjoy it for years to come. All photo mats/journaling blocks are the standard wallet size (2 1/2 x 3 1/2"). I tied tulle to the binding of the book for a little extra frill. The papers chosen for this book are not in your typical girly fashion, but I did try to add in pops of pink here and there. Here is my finished project:
 See the great texture of the crackle medium?!! I love this stuff! The hubby better be careful, I'll be painting this stuff on anything clear if I get bored. LOL. The flowers that you see were hand cut from a piece of Fancy Pants patterned transparency.
 These alpha's from Fancy Pants are so cute and elegant! Loved those!
 Page One:
I cut this silhouette of a girl out using my Cricut and SCAL software. This first page is canvas.
 Back of Page One, Front of Page Two
 On all of the tabs, I added pearls/rhinestones so that the pages would stay clean from where people turn the pages. Also provided great dimension. Y'all know how I love dimension!
 Back of Page Two, Front of Page Three
 These little birdies are so 'tweet!' They are rub on's from Fancy Pants.
 Back of Page Three, Front of Page Four
(Page Four is canvas as well.)
 This paper I used on the back of Page Three is like transparency and flocked on top. It's so velvety smooth!
 Page Four
 Another little birdie...
 Back of Album. I used the Crackle Medium on the back as well and added flowers like on the front of the album. I also stamped my personalized stamp onto cardstock to add to the back.
Okie dokie, that is all for me today. I hope you all have a wonderful weekend!
Happy Scrappin' to ya!!!
Pin It!

Friday, April 8, 2011

My Core'dinations Creative Frenzy

Happy Friday Everyone! How are you on this beautiful day?! I hope you are doing well and I am so excited to share my blog post with you today!!! This blog post is all about one of my absolute FAVORITE cardstock brands...Core'dinations!!! Since the first day I discovered this amazing product, I have been in love and use it on a regular basis. You can sand it, you can tear it, you can leave it as is...no matter how you work it, it is fabulous on any scrapbooking medium!!

AND GUESS WHAT?!!! Core'dinations is hosting their DT Call!!! Yea!!! If you are interested in trying out, go HERE for all of the scrappy details!!! I hope you all will try out with me! We don't know until we try, right?! So I just decided to go for it. And good luck to you as well!

Now, for my 3 projects, I focused on the following Core'dinations stacks:

Jillibean Soup Core Impressions
 Gemstones Collection
 Whitewash Collection
 "Hello" Card
Supplies Used:
Cardstock: Core'dinations
Patterned Paper: Jillibean Soup, Lilybee Design
Flowers: Prima Marketing
Bling: Glitz
Brads: The Paper Studio
Buttons: American Crafts, The Paper Studio
Alphabet Stickers: Jillibean Soup
Tool: sanding block
Electronic Cutter, Cartrides: Cricut (Provo Craft), Home Decor'

Well if you know me, you know that I love easel cards! So I started out making this easel card. My inspiration for this card came from the coordinating Jillibean Soup Core'dinations cardstock and patterned paper I had in my scrappy stash. I cut the Core'dinations cardstock to 5 1/2" x 5 1/2". I then took my sanding block and sanded lightly to reveal the design that is in the paper. I really loved the grid design it had to it. I then flipped over the same piece of paper and used a circle template to draw a circle. Next, using my glass mat and craft knife, I cut the inside of my circle so that when I flipped the cardstock back over I could fold it out and create a star burst effect. This also helped me to show how even the backside of the Core'dinations cardstock is perfect for any project. I used brads to secure the pieces of my star burst 'flaps' and then I added buttons for extra dimension. I matted this star burst paper onto the coordinating patterned paper from Jillibean soup. I then added a floral embellishment to the center. Last, I designed the bottom of the card using my die cutting machine and alphabet stickers. To keep the easel card in the open position, I added 2 buttons stacked on top of one another. Here is my finished project:
 See how this Core'dinations cardstock sands beautifully? I believe sanding is my favorite thing to do with this product! It's also a great way to relieve any frustrations! LOL
 Up close of my flower...
 I sanded the same cardstock I used on the card face for the die cut piece I added my letters to.
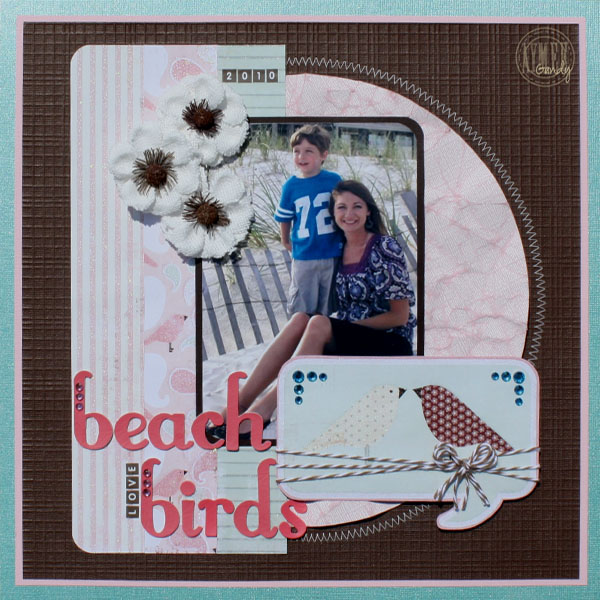
 "Beach Lovebirds" Layout
Supplies Used:
Cardstock: Core'dinations
Patterned Paper: My Mind's Eye
Alphabet Stickers: American Crafts, Kaisercraft
Flowers: Prima Marketing
Twine: Divine Twine
Bling: Queen & Co.
Thread: Coats & Clark
Tool: sewing machine
Electronic Cutter, Cartridges: Cricut (Provo Craft), Plantin' Schoolbook

For this layout, I started out with a base of Core'dinations Gemstone cardstock. I loved the way the shimmery effect is has matched my glittery patterned paper. This page really sparkles when the light hits it. I  then layered some Core'dinations Core Essentials cardstock and Core'dinations Jillibean Soup Collection cardstock over that. This time, I decided not to sand the embossed Core'dinations Jillibean Soup piece of paper. I wanted the embossing to be a more subtle effect. Next, I cut a 9" circle out using my die cutting machine and a piece of the Core'dinations Whitewash Collection pink cardstock. After cutting, I took the cardstock and crumpled it up into a ball several times until I had the distressed effect I was going for. I love crumpling up the Whitewash Collection cardstock. You can get the sanded effect without actually sanding because the folds on the paper expose the core color. After adhering everything down, I did a bit of stitching and added various embellishments. This layout features my wonderful sister in law, Caressa, and my nephew, Carter.
 See how crumpling the pink Whitewash Collection cardstock shows the pink center? Love it!
 I popped up these flowers for added dimension. I also like how the texture in the petals of these flowers resembles the embossed pattern in the brown Jillibean Soup cardstock.
 My alphas...
 I cut this bird tag out of a piece of My Mind's Eye patterned paper and tied some twine around it.
 More of that awesome Core'dinations action up close so you can see...
 "Gandy" Altered Picture Frame for the 4th of July
Supplies:
Cardstock: Core'dinations
Alphabet: Jillibean Soup
Brads: The Paper Studio
Pearls/Bling: Queen & Co
Tool: sanding block
Embossing Machine, Folders: Cuttlebug (Provo Craft), Stars
Punch: Imaginisce (it's the I-Top punch)
Electronic Cutter: Cricut (Provo Craft)
Electronic Cutting Software, Font: Sure Cuts A Lot (Craft Edge), French Script

I created this altered frame to hang on our front door for the month of July. 'Gandy' is my last name and that is what the large 'G' in the background is for. This project features Core'dinations cardstock from the Jillibean Soup Collection, the Gemstone Collection, and the Whitewash Collection. I started with a basic frame I picked up at a local dollar store. I then created my flag background by tearing red and white strips of paper. The red paper is the star embossed paper from the Jillibean Collection and the creamy white paper is from the Whitewash Collection. I really loved the creamy white because when you tear into it, it reveals a darker cream colored core. It inspired the vintage feel I tried to go for on this project. The tearing also helps define each of the strips of the background. For the blue part in the corner, I used a piece of blue paper from the Gemstones Collection. Once torn, I embossed this with the Cuttlebug 'Stars' folder and sanded it to bring out the stars. I then added a rhinestone to each of the center of the stars for added pop. Next, I cut out the big 'G' for the background and added the alphabet letters. I popped those up using my Helmar Zap Dots. Last I used a mixture of the Imaginisce I-Top punches to create dimensional flowers, all cut with various Core'dinations cardstock. I popped those up in layers with my Helmar Liquid Scrap Dots. And finally, I added blue ribbon as a hanger. Here is my finished project:


 Can you see how the red cardstock strips are embossed? I love that the stars on them helps bring out my patriotic theme.
Now, is that not the longest blog post ever?! LOL! I don't think I've ever typed so much, but I appreciate you taking the time to stop by my blog and take a peek! Remember to try out for the Core'dinations DT Call!!!! Best of luck to all who apply!

As always, Happy Scrappin'!!!
Pin It!