A Scraphappy Southernbelle

Wednesday, February 29, 2012

Showing Off A New Dressy!

Katie Scarlett wanted to share her new dressy from Jacque at Bella's Prissy Puppie Boutique. Isn't she so cute?! I just love dainty pink fabrics on my sweety pie!


Have a great day y'all!
Pin It!

Tuesday, February 28, 2012

Live, Laugh, Love with Momenta

Hey y'all! Happy Tuesday! I hope you are having a fabulous day! I just finished up a project that I wanted to share with you. I have been playing around with my Momenta goodies today to create an altered frame to hang in my home. I found this frame for free in some old boxes we had in the garage! I almost threw it out and then I thought...no, I can alter this! So that is what I did!

"Live, Laugh, Love"

Momenta Supplies Used
ST-3372 Love Pfy Title
ST-3373 Laugh Title
ST-1740 PUR Bubbles & Bling Stickers
ST-4723 For Wedding Clear Layered
PK-2147 BLT 12x12 SB Pad

Other Supplies Used
ribbon, frame, adhesive
 For the 'Live' frame, I used some gray embossed cardstock from the Momenta BLT 12x12 Paper Pad. I then added a mixture of stickers to the top of the glass.
The background patterned paper on the 'Laugh' frame is from the same patterned paper pack.
 I used the same gray embossed cardstock for the 'Love' frame. I also added stickers that came with the message stickers on the wooden part of my frame. I finished it up with some ribbon bows and a ribbon hanger.
 Up close of the stickers so you can see the glittery shimmer they have to them.
 Love me some clear layered stickers from Momenta!
Thanks for dropping by my blog! I hope you have a fabulous day!

Happy Scrappin'!!!
Pin It!

Our Day At The Park

Hey guys! Me, Brandon, and Katie Scarlett all went to the park yesterday. It was such a beautiful day we had to get out. I made a little slideshow of our trip. We had a grand time! Please excuse our casual clothes and no makeup...LOL! We did not go out beautied up! :)
Click to play this Smilebox slideshow
Create your own slideshow - Powered by Smilebox
Free picture slideshow personalized with Smilebox
Pin It!

Monday, February 27, 2012

Celebrating A Golden Birthday

Hey y'all! Happy Monday! I'm here with you today to share a project I have created for a Golden Birthday. I have a client who asked me to create a special project for her. She has a daughter named Eva who will be celebrating her Golden Birthday this March. Eva will be turning 9 years old on March 9th and they will be celebrating her special day in a big way. I was asked to create a card that could be a keepsake for Eva to have as she grows older. It was requested that I use lots of golds to match the 'Golden Birthday' theme. When I thought of all this gold, the theme of 'old Hollywood' came to my mind. I knew I wanted it to be super girly and use lots of vintage patterns. I also wanted to use a silhouette and a vintage font. With the use of my Cricut and several other scrappy goodies, here is what I came up with...

"Happy Birthday"

Supplies Used
Cardstock: Core'dinations, The Paper Studio
Patterned Paper: Die Cuts With A View, The Paper Studio
Pearls, Rhinestones: Queen & Co, Studio 18, Michaels
Flower: Prima Marketing
Lace, Floral Embellishments: bought locally at Surplus City
Crinkle Ribbon: My Craft Spot
Stickers: Making Memories
Jewled Brad: Creative Charms
Border Punch: Fiskars
Thread: Coats & Clark
Electronic Cutter: Cricut Expression (Provo Craft)
Cartridge: Gypsy Wanderings
Softare: Cricut Gypsy, Sure Cuts A Lot (Craft Edge)
SVG: My Grafico
Adhesive: Helmar, Zip Dry (Beacon), hot glue/hot glue gun
Other: sewing machine, bone folder, transparency
 The silhouette of the little girl is from the 'Gypsy Wanderings' cartridge. I placed it on a shape that I cut out using the same cart and added some rhinestones. I also added the number '9' since Eva will be turning 9 on her birthday.
 This phrase is also from the Gypsy Wanderings cartridge. The card is a 5x7 inch easel card. The jeweled brad holds the card up when opened.
 I used pop dots to pop up the silhouette.
 Love this flower from Prima! I added some gold embellishments I found in the floral section at a local store next to it.
 A touch of pearls in the corner...
 The sticker that I used for the number has a glittery effect to it as well. I also added a rhinestone to the pony tail of the silhouette.
 This jeweled brad is from Creative Charms.
 When you flip the card over on the back, I left a blank space so that Eva's parents could write her a special message on her birthday.
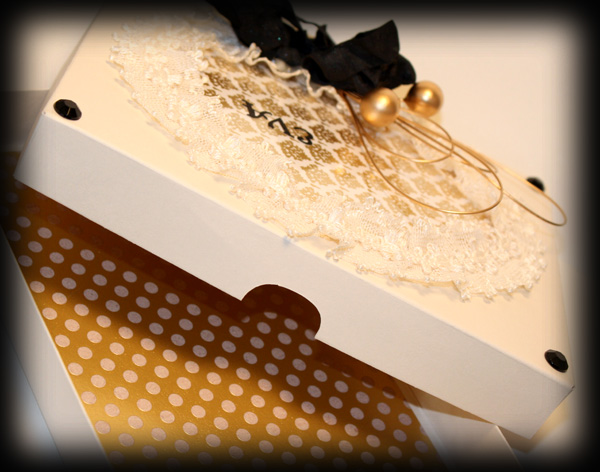
 Now, since this card is 3 dimensional, I knew it would not fit in a standard envelope. Also, since the client mentioned they wanted it to be a keepsake, I wanted some way to keep the card safe when not in use. So I cut this gift box out using my Cricut, SCAL software, and a file from My Grafico. I decorated the gift box to match the card.
 I added Eva's name to the front as well as some crinkle ribbon from My Craft Spot.
 Here you can see the gift box top opened to reveal the card inside...
 I lined the inside of the box with coordinating paper as well.
I hope Eva will enjoy this card! Thanks for visiting my blog!

Have a good one!
Happy Scrappin'!!!
Pin It!

Friday, February 24, 2012

5 More Minutes...

Pin It!

Wednesday, February 22, 2012

My Little Sock Monkey

Click to play this Smilebox slideshow
Create your own slideshow - Powered by Smilebox
Personalize your own free photo slideshow
Pin It!

Monday, February 20, 2012

My Craft Spot Challenge #45-Birthday Shaped Cards

Hey y'all! Happy Monday! How was your weekend? Did you do anything fun? I had a great weekend! I got to spend some time with the hubby and work at my crafty desk! Good times! I hope all of you had a fun filled weekend!

It's Monday and that means another fun challenge for you guys at My Craft Spot! Yay! This weeks challenge is Birthday Shaped Cards. I just love shaped cards! They are so fun to create and a bit different from the norm. The possibilities are endless. If you would like to see my fellow DT's shaped cards and check out how you can enter the challenge, go HERE. Of course, there is a prize up for grabs! Woot Woot! So check it out! We'd love to see what you can come up with!

For my card this week, I made a shaped card in the shape of a dog house. I used my Cricut and Gypsy to create this card. Of course I also added in lots of goodies from My Craft Spot. Here is what I came up with...

"Another Birthday?"

Supplies Used
Cardstock: The Paper Studio, Bazzill Basics Paper, Core'dinations
Patterned Paper: Momenta
Stamps, Twine, Crinkle Ribbon: My Craft Spot
Rhinestones: Studio 18
Ink: Stampin' Up!
Electronic Cutter: Cricut Expression (Provo Craft)
Software: Cricut Gypsy
Cartridge: Create A Critter
Adhesive: Helmar, Zip Dry (Beacon Adhesives)
Other: craft knife, glass cutting mat
 As you can see below, the front 'door' of my dog house opens so you can sneak a peek inside at the dog and sentiment. To open the door, I used my craft knife and a glass cutting mat. I cut very carefully around the door. The glass mat underneath helped my blade to glide a bit more smoothly.
 I decorated around my door with some twine and rhinestones.
 I used some pink crinkle ribbon to do a double bow on the top of my dog house.
 For the inside, I stamped my sentiment using the 'Inside & Out #1' stamp set from My Craft Spot. I also added a little doggy. I just loved this dog! She's so cute! I gave her a bow with some bakers twine. I think I shall name her Pheobe. She just looks like a Pheobe to me! Tee hee!
I hope that you have enjoyed this project and that you will hop on over to My Craft Spot to join us in the challenge! See you there!

Thanks for visiting my blog! Happy Scrappin'!!!
Pin It!

Sunday, February 19, 2012

My First Dress!!!

Hey guys! Well, I had to share this! I am learning to make dog dresses for my Yorkie, Katie Scarlett. Now, I am not a seamstress by any means. I took a beginners sewing class a couple of weeks ago and bought a few supplies. I have sewn many times on paper with my scrapbooking projects, but not much with fabric. It kind of makes me nervous, but I am determined to learn!

I attempted my first dress last week, but lets just say it was pitiful! LOL! It wasn't even wearable! So with lots of help, I gave it a second try. Now, this one I am sharing now is not perfect. I made a few boo boo's, but I am learning. And at least this one is wearable! Tee hee!

I used this McCalls pattern. I chose to use the pattern to make a dress like the pink one shown here on the front...
I purchased this yellow fabric at JoAnn. I love yellow on Katie Scarlett. It looks so good with her darker fur. You'll have to excuse her messy hair. She was such a good girl and played all day long while Mommy sat at her sewing desk.
 The back has a d-ring so I can attach a leash on this dress. It also has a fabric bow. I didn't even get to the fabric bow part on the first dress. LOL! So at least I made a little progress with this one. I need to work on keeping my stitches a little straighter, but I'm getting there.
 Here is another view of the back...
 Here is a view from the side. I wish the dress were a bit longer. I may work on that next time.
 She loves her new dressy!
So, what do you guys think? Is it ok? I sure did try! I have to admit...this sewing stuff is addictive!

Have a great night!

Pin It!

Saturday, February 18, 2012

Roll Tide!

Click to play this Smilebox slideshow
Create your own slideshow - Powered by Smilebox
This picture slideshow customized with Smilebox
Pin It!

Wednesday, February 15, 2012

Katie Scarlett Isn't Very Happy With Her Mommy Tonight! Tee hee!

Click to play this Smilebox slideshow
Create your own slideshow - Powered by Smilebox
A free picture slideshow by Smilebox
Pin It!

Tuesday, February 14, 2012

Awww! How Sweet!

Awww! I just had to share what Katie Scarlett and I just got!!! The florist brought us a beautiful bouquet of Stargaizer Lillies from my hubby!!! How sweet is that!! He knows these are my favorite flowers ever! These were the flowers that were in my wedding bouquet. I am just so blessed!!! Thank you to my wonderful husband, Brandon!!! I love you!!!
 The pop of coral pink is just gorgeous! My favorite!
 Can't wait to see these bloom all the way!
 Another bloom peeking out...
 And look at the adorable card that came with...how sweet!!!
Happy Valentine's Day Everyone!!!
Pin It!

Peace, Love, & Yorkie

Hey y'all! Happy Valentine's Day!!! I hope you all have a wonderful day with your sweeties! The hubby says he has a surprise for me...hmmm...wonder what it could be? Tee hee! We shall see!

First off, I just have to share the Valentine's Day Ball slideshow from Yorkie Talk with you guys! My Katie Scarlett and her date, Peyton, are about half way in. Soooo cute!!! Here is the link:


I also want to share a card with you that I made yesterday. This card celebrates my love of Yorkies!

"Peace, Love, & Yorkie"

Supplies Used
Cardstock: The Paper Studio, Core'dinations
Patterned Paper, Stickers: Echo Park Paper Co.
Twine: My Craft Spot
Rhinestones: Michael's
Alphabet Stickers: Pink Paislee
Thread: Coats & Clark
Electronic Cutter: Cricut Expression (Provo Craft)
Software: Sure Cuts A Lot (Craft Edge)
SVG's: Craft Edge, personally made the Yorkie
Adhesive: Helmar
Other: sewing machine
 I used my sewing machine to add a decorative stitch to the front of the card.
 I used pop dots to pop up some things on the card.
 Inside of my card:
AND, news for ya! I have decided to open my own little Etsy shop. I have so many people who have been kind enough to ask me to create cards for them and others who say I should sell my cards...so I decided to open a little shop for fun. Maybe I can make just a tad to help fund my addiction for buying my Yorkie, Katie Scarlett, stuff! Tee hee! Here is the link to my new shop if you'd like to visit. It is small right now, but I hope to build it into something bigger. Thanks for looking!


And Thanks for stopping in today! Have a wonderful day!
Happy Scrappin'!
Pin It!