A Scraphappy Southernbelle

Tuesday, August 30, 2011

My Craft Spot Blog Hop WINNER!!!!

Hey guys! I hope you all had a fabulous weekend! I wanted to hop online right quick to post the winner of the My Craft Spot Blog Hop!!! The winner will receive this fabulous stamp set from My Craft Spot!
Isn't it aweseome?!!!

So, I had 71 comments on the blog hop post. I put the numbers 1-71 into a true random number generator at random.org and the first number pulled was.....
#25!!!!

So that means that the 'Cricut Couple' has WON the stamp set!!! Yay! Congrats to the Cricut Couple and I will be getting in touch with you asap!

Also, I want to thank everyone who joined us for the blog hop! I hope you all had as much fun as we did! Happy Scrappin'!!!


Pin It!

Monday, August 29, 2011

My Craft Spot Challenge #23-Stitching

Hey y'all! Happy Monday to you! I hope you all had a fabulous weekend! It's the start of a new week and you know what that means...another FUN challenge at My Craft Spot!!! This week we are featuring stitching! Yep, whether it's done by hand, machine, or faux...stitching is where it's at! It can add a fun touch to any scrappy project! 

For my project, I have created a card featuring stitching with my sewing machine. I think every crafter should have a sewing machine in their studio! They are so much fun! I often joke that my sewing machine never touches fabric, only paper. But it really is true! I think I've sewn fabric onto paper maybe 5 times, but other than that...it's all paper baby! LOL!

"S'More" Card

Supplies Used
Cardstock: The Paper Studio, Bazzill Basics Paper
Patterned Paper: Die Cuts With A View
Crinkle Ribbon, Stamp: My Craft Spot
Rhinestones: Queen & Co
Thread: Coats & Clark
Ink: ColorBox (Clearsnap), Stampin' Up!
Electronic Cutting Machine: Cricut Expression (Provo Craft)
Software: Sure Cuts A Lot (Craft Edge)
SVG: SVG Cuts, My Scrap Chick
Adhesive: Helmar
Other: sewing machine

I cut the card base and shapes on the card (circle, rounded squares, scalloped border) out using the 'Card Essentials 2' set from My Scrap Chick. You can find that HERE. The S'More was a freebie from SVG Cuts and you can find that HERE. The crinkle ribbon is a color called 'Sandy Beach.' I layered it down using a tiny bit of adhesive and then went back over it with a straight stitch using my machine. I added a zig zag stitch to some of my patterned paper.
Isn't this little S'more guy the cutest?!!! I love him! Thank you to SVG Cuts for sharing this freebie!!!
I popped up the circle and the s'more using Zap Dots for extra dimension.
For the inside of the card, I stamped a cute 'chocolate' sentiment using the "Inside & Out Set #1" from My Craft Spot.
I hope you have enjoyed this card! If you'd like to join us for this fun challenge, hop on over to My Craft Spot! We'd love to see what stitchy projects you can come up with!

Happy Scrappin'!!!
Pin It!

Sunday, August 28, 2011

A Bewitching Treat Bag

Hey guys! Happy Sunday! I hope you are having a 'bootiful' weekend! I know it's only the end of August, but I have really been in a Halloween mood these past few weeks. Well, I've got a DT post going up on the Momenta blog today and I wanted to share my spooky project with you here as well. I have created a 'witchy' treat bag that is filled with these 3 little glass bottles.

"Trick Or Treat" Gift Bag

Supplies Used
Cardstock, Patterned Paper, Stickers: Momenta
Tulle, Black Trim: Hobby Lobby
Electronic Cutting Machine: Cricut Expression (Provo Craft)
Software: Sure Cuts A Lot (Craft Edge)
SVG's: My Scrap Chick, My Grafico
Stapler/Staples: Swingline
Decorative Edge Scissors: Fiskars
Adhesive: Helmar

The treat bag was cut using the 'Bigger Bags' svg set from My Scrap Chick and you can find that HERE. The witches shoes/legs were cut with a svg set called 'Trick or Treat Diva' from My Grafico and you can find that HERE. The front of the treat bag is the bottom half of a witch. I used a basic pleat on some polka dot patterned paper and purple tulle for her 'skirt.' I added a green border sticker for her 'belt' and round puffy sticker for her 'belt buckle.' Here is my bag...
See the purple tulle sticking out from under her skirt? I thought it would be a fun, 'netting' type of look. I stapled it on and covered up my staples with the 'belt' sticker.
Here is the back of the bag...
Aren't these puffy stickers from Momenta awesome? I love the dimension they add!
I used some leftover patterned paper to line the inside of my treat bag for an extra pop of color.
Here are the 3 little glass bottles that go inside the bag. I will fill these with brightly colored Halloween candies when the holiday season draws near.
I hope you have enjoyed this witchy treat bag! Thanks for visiting my blog today! Take care!

Happy Scrappin'!!!
Pin It!

Friday, August 26, 2011

Welcome To The 'My Craft Spot' Blog Hop

Hey y'all! Welcome to the 'My Craft Spot' Blog Hop!!! I hope you all are having a marvelous time hopping along with us! If you are just starting and would like to do the hop in order, below is a link list for you:


If you are hopping right along, I'd like to take a moment to welcome you to my blog! My name is Aymee and I am so glad you are here! Are you enjoying the hop so far? I sure hope so! Man, talk about all the fabulous scrappy inspiration! I am in awe today of all the amazing artwork created by my fellow 'My Craft Spot' DT Members! Way to go girls!

Now, I'd like to share my project that I have created for the hop with you guys. I have created a 'bewitching' hanging altered project to display in my home for the upcoming Halloween holiday. I created this frame out of 3 frames I purchased at The Dollar Tree! So each of these frames were a buck a piece! You can't beat that! Be sure to check out your local dollar stores! You'd be amazed at the cute frames they have that are perfect for altering!

"Would A Bad Witch Wear Shoes This Fabulous" Altered Project

Supplies Used
Cardstock: Bazzill Basics Paper, The Paper Studio
Patterned Paper: Die Cuts With A View
Stamp, Twine, Crinkle Ribbon: My Craft Spot
Orange Ribbon, Black Decorative Trim: Hobby Lobby
Buttons: American Crafts
Rhinestones: Queen & Co.
Ink: ColorBox (Clearnsap), Stampin' Up!
Electronic Cutter: Cricut Expression (Provo Craft)
Cartridges: Happy Hauntings, Accent Essentials
Adhesive: Helmar
Frames: The Dollar Tree

Here is my project:
I used Helmar 450 to adhere this black trim to the back of each of my frames and for the orange ribbon that links the frames together. For this first frame, I cut the witch silhouette out using my Cricut and the 'Happy Hauntings' cartridge. I adhered the 'Marmalade' Crinkle Ribbon, black/orange twine, and button using Helmar Liquid Scrap Dots.
For the middle frame, I stamped this FABULOUS sentiment from the 'Candy Corn Kisses' stamp set. I just LOVE this sentiment! I think it is my favorite on the set. I then cut the background shape out using the 'Accent Essentials' cartridge.
For the third frame, I cut these witch boots out using the 'Happy Hauntings' cartridge.
Here is an up close view of my bow. Isn't this crinkle ribbon and black/orange twine just divine?! I'm in love!
I hope you have enjoyed this project! It was so easy to create and I can't wait to display it in my home!

BUT WAIT, before you hop along to the next blog, check this out! Kimberly, the owner of My Craft Spot, has graciously donated the brand new 'Candy Corn Kisses' stamp set for me to give away to one randomly chosen person who leaves a comment on this blog post!!! The winner will be drawn Tuesday, August 30th! So be sure to check back to see if the lucky winner is YOU! AND here is a picture of the stamp set being given away!!! How CUTE are these?!


Good luck everyone!

Happy Hoppin' to you! Have a fabulous day!

Pin It!

Wednesday, August 24, 2011

Debut of the 'Happy Fall' Stamp Set

Hey guys! How are you doing on this beautiful Wednesday?! Are you enjoying your week? I hope so! This is such a fun week for me because we are debuting the new stamp sets at My Craft Spot. If you haven't been following along with us, be sure to hop on over to the blog to see what you have missed. There is some fabulous scrappy inspiration (and PRIZES) to be had!!! Check out the blog HERE.

Today I have 2 projects to share with you featuring the new 'Happy Fall' stamp set.

"Happy Harvest" Card

Supplies Used
Cardstock: Core'dinations, The Paper Studio
Patterned Paper: Die Cuts With A View
Crinkle Ribbon, Stamp: My Craft Spot
Pearls: Queen & Co.
Pumpkin Button: The Paper Studio
Ink: Stampin' Up! ColorBox (Clearsnap)
Electronic Cutter: Cricut Expression (Provo Craft)
Cartridge Used: Home Accents
Software: Cricut Gypsy (Provo Craft)
Adhesive: Helmar

I designed this shaped card on my Gypsy using the Home Accents cartridge.

I used Zap Dots to pop up the die cut that I stamped my sentiment on for added dimension.
I also stamped another sentiment from the 'Happy Fall' stamp set on the inside of my card.
"Give Thanks" Scarecrow Shaped Card

Supplies Used
Cardstock: The Paper Studio, Core'dinations
Patterned Paper: Die Cuts With a View
Stamp, Twine: My Craft Spot
Rhinestones: Queen & Co.
Ink: Stampin' Up!
Electronic Cutter: Cricut Expression (Provo Craft)
Cartridges: Celebrate With Flourish, Home Decor'
Software: Cricut Gypsy (Provo Craft)
Adhesive: Helmar

I designed this scarecrow shaped card using my Cricut Gypsy as well. I have loved this scarecrow shape from the 'Celebrate With Flourish' cartridge ever since I saw it and am so glad I finally got to use it.

I used Zap Dots to pop the die cut that I stamped the sentiment onto for added dimension on this card.
I hope you have enjoyed these two cards. Be sure to hop on over to My Craft Spot to see more scrappy inspiration using these new stamps!

Have a wonderful day! Happy Scrappin'!!!
Pin It!

Tuesday, August 23, 2011

Oh Snap! Your Love Is Definitely Where It's At!

Hey y'all! Happy Tuesday to you! Today I have a little card to share with you that I made for my hubby. I just made this card for no reason. It's not an anniversary or anything, I just wanted to remind him how much I love him. Things have been going really great for us here lately. We are just so happy and I wanted to celebrate that. Kinda corny I know, but I think he'll like it!

"Oh Snap" Card

Supplies Used
Cardstock: The Paper Studio
Patterned Paper: Cosmo Cricket, K & Company
Pearls: Queen & Co
Thread: Coats & Clark
Circle Cutter: Creative Memories
Electronic Cutter: Cricut Expression (Provo Craft)
Cartridges Used: Gypsy Wanderings, New Arrival, Smiley Cards, Lyrical Letters
Software: Cricut Gypsy (Provo Craft)
Font: Allison's Hand
Adhesive: Helmar
Other: sewing machine, printer

I used my Gypsy to design this shaped card. It was fairly easy to pull together. It took me about an hour to finish this one. I plan on giving it to him when he gets home from work today.
 I love this little sweet pea! It's from the 'New Arrival' cartridge. This is an older Cricut cartridge, but I have been trying to challenge myself to use some of the cartridges I haven't used in a while.
 I used Zap Dots to pop up my banner a bit and the fabulous twine is from My Craft Spot.
 I used my Microsoft Word program to type up a a little sentiment for the back. I used a font I found online called Allison's hand. I printed out the sentiment on some cardstock and then cut it with my Creative Memories circle cutter.
I hope all of you have a phenomenal day! Take care and see you tomorrow!

Happy Scrappin'!
Pin It!

Monday, August 22, 2011

Debut of the 'Candy Corn Kisses' Stamp Set

Hey guys! Happy Monday! I am so excited that the new week is here and do you want to know why?!!! BECAUSE this week we are having a 'Stamp Release Party' over at My Craft Spot to celebrate the release of 4 new stamp sets! Woot Woot! AND there will be new posts going up every day this week showcasing these new stamps. AND there's still more...there will also be a blog hop on Friday to share even more of these fabulous new stamps! AND one more thing....don't forget the PRIZES!!! There are going to be some fabulous one's given away so make sure you check out My Craft Spot each day this week for your chance to WIN!!! Yippie!!!!!!

Today I have 2 projects from the new 'Candy Corn Kisses' stamp set to share with you. I had so much fun working with these new stamps! They are so cute!

"Boo" Cookie Box

Supplies Used
Patterned Paper: Die Cuts With A View
Crinkle Ribbon, Twine, Stamp: My Craft Spot
Button: Pink Paislee
Rhinestones: Queen & Co.
Ink: Stampin' Up!
Electronic Cutter: Cricut Expression (Provo Craft)
Software: Sure Cuts A Lot (Craft Edge)
Cookie Box SVG: My Scrap Chick
Adhesive: Helmar
Store-bought Cookies (LOL): Giant Food Stores

This little cookie box was cut using my Cricut and a freebie from My Scrap Chick. It holds 3 cookies.
I tied the crinkle ribbon around the box to help hold it shut. I then added some of this ADORABLE black/orange twine to the button and adhered it over my crinkle ribbon bow.
Up close of the bow.
"Fright Night" Shaped Card

Supplies Used
Cardstock: The Paper Studio, Bazzill Basics Paper
Patterned Paper: Die Cuts With A View
Twine, Stamps: My Craft Spot
Rhinestones: Queen & Co.
Ink: Stampin' Up!
Electronic Cutter: Cricut Expression (Provo Craft)
Cartridges: Happy Hauntings, Mini Monsters, Home Decor'
Software: Cricut Gypsy (Provo Craft)
Adhesive: Helmar

I used my Gypsy to create this shaped card. The base shape is a frame from the 'Happy Hauntings' cartridge. I used twine to create my own 'spiderweb' in the background.
I love this stamp from the 'Candy Corn Kisses' set. It looks so spooky!
I stamped another sentiment on the inside of my card and added a little trick-or-treater from the Mini Monsters cartridge.
I hope you have enjoyed these projects. Be sure to hop on over to the 'My Craft Spot' blog today to see more inspiration using this stamp set.

Thanks for dropping in! Have a great day!
Happy Scrappin'!!!

P.S.  I have another new project going up today that I'd love for you to check out! It's in the post directly below this one and I think it'll give you a chuckle! :)
Pin It!

A Bun In The Oven

Hey y'all! Happy Monday! I know, I know...you are probably thinking what is up with today's post title?!! Is Aymee pregnant? Is she crazy? Is she trying an attempt at some corny humor?!! LOL! Well...first of all, no I am NOT pregnant. I would love to be, but it's not my time just yet. BUT I am attempting some humor and have a BIG announcement to make that I am so happy about! I am going to be an aunt again! Yep, 9 months from now I'll have another little sweetie pie to spoil! My brother and sister in law have announced they are expecting their second child!!! So I wanted to make them a card to congratulate them. I wanted to let them know how happy Brandon and I are for them. I hope this card will make them smile!

This card is also for my DT post today on the "She's A Sassy Lady" blog. I'll have a little tutorial going up over there with how I created this card. If you'd like to check that out, HERE is the link for ya.

 
"Bun In The Oven" Card


Supplies Used
Cardstock: The Paper Studio, Bazzill Basics Paper
Patterned Paper, Die Cuts: Colorbok
Pearls: Queen & Co
Twine: My Craft Spot
Ink: ColorBox (Clearsnap)
Electronic Cutter: Cricut Expression (Provo Craft)
Cartridges: Gypsy Wanderings (card base/card front), Wild Card (sentiment), New Arrival (baby), From My Kitchen (oven), Simply Charmed (bun)
Software: Cricut Gypsy (Provo Craft)
Adhesive: Helmar
Velcro

I created this shaped card with my Gypsy. The front of the card features a little retro looking oven. The 'oven door' on the front of the card folds down to reveal a little 'bun' inside...hence 'bun in the oven.' If you are not familiar with this saying, many people say this when they are expecting a baby. I figure most people know that already but just in case they didn't I wanted to explain. LOL. Here is the front of the card:
Here is a closer view of the oven. The little die cut on the front is from Colorbok. I added a twine bow to the top of it. The twine is from 'My Craft Spot.'
Here is the oven door opened up. I used a Velcro dot to hold the door shut when not in use. I cut the little bun out using my Cricut and inked it up a bit for some added texture.
I achieved the opening door mechanism by using a basic cardstock hinge I made with some scrap cardstock. I used lots of Zap Dots on this card for dimension.
Inside of Card...
I tried to use gender neutral colors on this card since we do not know if the new arrival will be a boy or a girl yet.

For the back of the card, I added another die cut from Colorbok and my custom stamp.
I hope you have enjoyed this card! It took me about 4 hours to do this one. It wasn't hard, but I kept changing my mind on colors of cardstock and patterned paper.

Thanks for visiting my blog! Have a fabulous day!
Happy Scrappin'!!!
Pin It!

Saturday, August 20, 2011

More Cards For 'Operation Write Home'

Hey y'all! Happy Saturday! I hope you are having a fabulous weekend! My hubby had to go in to work today so my Mom and I had us a little cropping party via Skype! We had a ball! I created a very fun card for my upcoming "She's A Sassy Lady" DT blog post that I am so excited to share. It will be on my blog on Monday. So stay tuned!

But in the meantime, I have more cards to share with you that I made for 'Operation Write Home.' I made every single one of these cards out of scraps. I opened up a lot of old kits in my kit drawer and pulled things from them. I really like making these from scraps. It helps to cut back on all that bulk in my scrappy studio. Tee Hee!

"You Are Loved"

Supplies Used
Cardstock, Card Base: The Paper Studio
Patterned Paper, Stickers: Echo Park Paper Co.
Alphabet Stickers: American Crafts, Doodlebug Design Inc.
Rhinestones: Queen & Co.
Corner Punch: EK Success
Adhesive: Helmar
 "Hi"

Supplies Used
Card Base: The Paper Studio
Patterned Paper, Alphabet Stickers, Sticker: Echo Park Paper Co.
Adhesive: Helmar
 "Hi"

Supplies Used
Card Base: The Paper Studio
Cardstock: Core'dinations
Patterned Paper, Alphabet Sticker, Die Cuts: Colorbok
Corner Punch: EK Success
Adhesive: Helmar
 "Hello"

Supplies Used
Card Base: The Paper Studio
Cardstock: Core'dinations
Patterned Paper, Sticker: Colorbok
Adhesive: Helmar
 "Home Is Where Your Heart Is"

Supplies Used
Card Base: The Paper Studio
Patterned Paper, Die Cut: Colorbok
Adhesive: Helmar
 "Family"

Card Base: The Paper Studio
Patterned Paper, Die Cuts: Colorbok
Pearls: Queen & Co.
Adhesive: Helmar
 "Flower" Card

Supplies Used
Card Base: The Paper Studio
Cardstock: Die Cuts With A View
Patterned Paper: My Mind's Eye
Chipboard: BasicGrey
Adhesive: Helmar
 "Hello"

Supplies Used
Cardstock, Card Base: The Paper Studio
Patterned Paper: Jillibean Soup
Alphabet Stickers: Bo Bunny
Chipboard: BasicGrey
Adhesive: Helmar
That's all for me today. Thanks for taking a moment to drop by my blog! I hope to see you again soon!

Happy Scrappin' to you!
Pin It!

Friday, August 19, 2011

Using Up Those Scraps!!!

Hey y'all! I have been busy at my desk for about 2 hours this evening working on some more simple cards for the 'Operation Write Home' Challenge. If you are not familiar with this challenge, it is where we make cards to send overseas to our troops so that they may in turn write to their loved ones. So tonight I decided to try to put a few last second ones together before I send these out. I was able to make all of these cards in about 2 hours. They are all really simple and all use scraps from my scrap bins. I used all scrap patterned paper, scrap cardstock, leftover ribbon/lace scraps, and leftover chipboard.

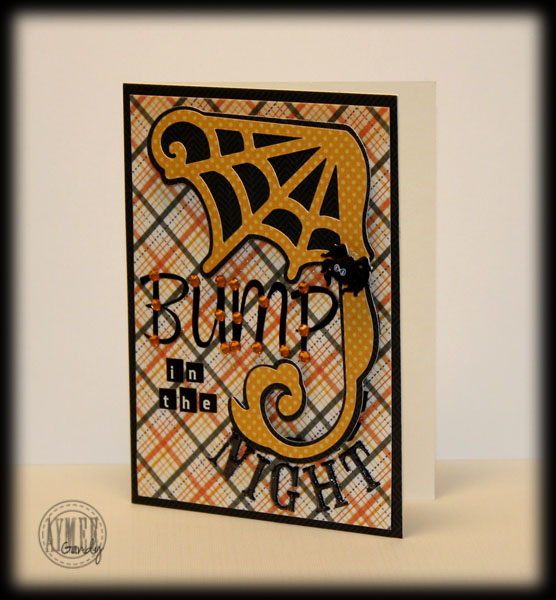
This first card is a Halloween card and I used the current Freebie at SVG Cuts! If you'd like to download this SVG for yourself, go HERE.

"Bump In The Night"

Supplies Used
Patterned Paper: Die Cuts With A View
Alphabet Stickers: American Traditional Designs, Momenta, Cosmo Cricket
Rhinestones: Queen & Co
Spider Button, Card Base: The Paper Studio
Electronic Cutter: Cricut Expression (Provo Craft)
Software: Sure Cuts A Lot (Craft Edge)
SVG's: SVG Cuts
Adhesive: Helmar
 I used a mixture of leftover alpha's on this card as well. I used Zap Dots to pop up the spiderweb corner flourish and Liquid Scrap Dots to attach my spider.
 This spider kinda freaked me out sitting on my desk waiting to be put on the card. I kept thinking 'I sure hope he doesn't sprout legs and scare the pants off of me!' LOL
 "Hi"

Supplies Used
Cardstock, Card Base: The Paper Studio
Patterned Paper: Die Cuts With A View
Alphabet Stickers: Momenta
Chipboard: BasicGrey
Pearls: Queen & Co.
Corner Punch: EK Success
Adhesive: Helmar
 I layered these 2 pieces of chipboard.
 "Apple Card"

Supplies Used
Cardstock, Card Base: The Paper Studio
Patterned Paper: Studio Calico, October Afternoon
Chipboard: BasicGrey
Trim: Surplus City
Border Punch: Martha Stewart Crafts
Adhesive: Helmar
 More trim used on this card from my favorite local store...Surplus City! I know y'all heard me talk about it before but this place is fabulous!!! They have a huge aisle of nothing but lace, ribbon, trims, etc. I go wild in there!
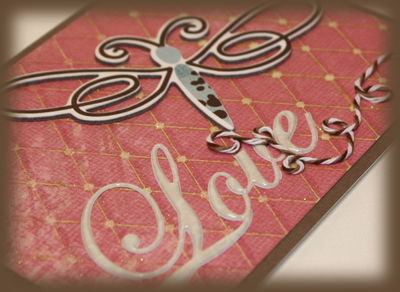
 "Love"

Supplies Used
Cardstock, Card Base: The Paper Studio
Patterned Paper: My Mind's Eye
Message Sticker: Momenta
Chipboard: BasicGrey
Twine: My Craft Spot
Corner Punch: EK Success
Adhesive: Helmar
 I added the twine for a little 'trail' effect of where the dragonfly has been before landing on the card.
 "Flower Card"

Supplies Used
Cardstock, Card Base: The Paper Studio
Patterned Paper: Fancy Pants Designs
Chipboard: BasicGrey
Pearls: Queen & Co
Corner Punch: EK Success
Adhesive: Helmar
 This one is about the most simple one I made today. I think I put it together in 5 minutes.
 "Dragonfly Card"

Supplies Used
Card Base: The Paper Studio
Cardstock: Die Cuts With A View
Patterned Paper: K & Company
Chipboard: BasicGrey
Lace/Trims: Surplus City
Adhesive: Helmar
 I got happy with more trims on this one! Tee Hee!
I know these are all super super simple, but I hope they will be enjoyed and help the troops write to their loved ones.

Have a great night everybody! And enjoy your weekend!
Happy Scrappin'!!!
Pin It!