A Scraphappy Southernbelle

Saturday, January 29, 2011

Fluttering By With A New Project & Something Tasty...

Hiya guys! I hope you are having a fabulous weekend! I only have a few minutes before I have to hop in the shower to get ready for a family get together tonight, but I wanted to hop online right quick and blog a bit. I wanted to share this project with you. It's another note card gift set, but it was inspired by the butterfly challenge over at Bitten By The Bug 2.  I can't tell you the last time I participated in a challenge of any kind...it's been ages! But I have been trying to do better at blog hopping and happened across this blog and was so inspired by all of the gorgeous butterfly projects. So I decided to play along as well.

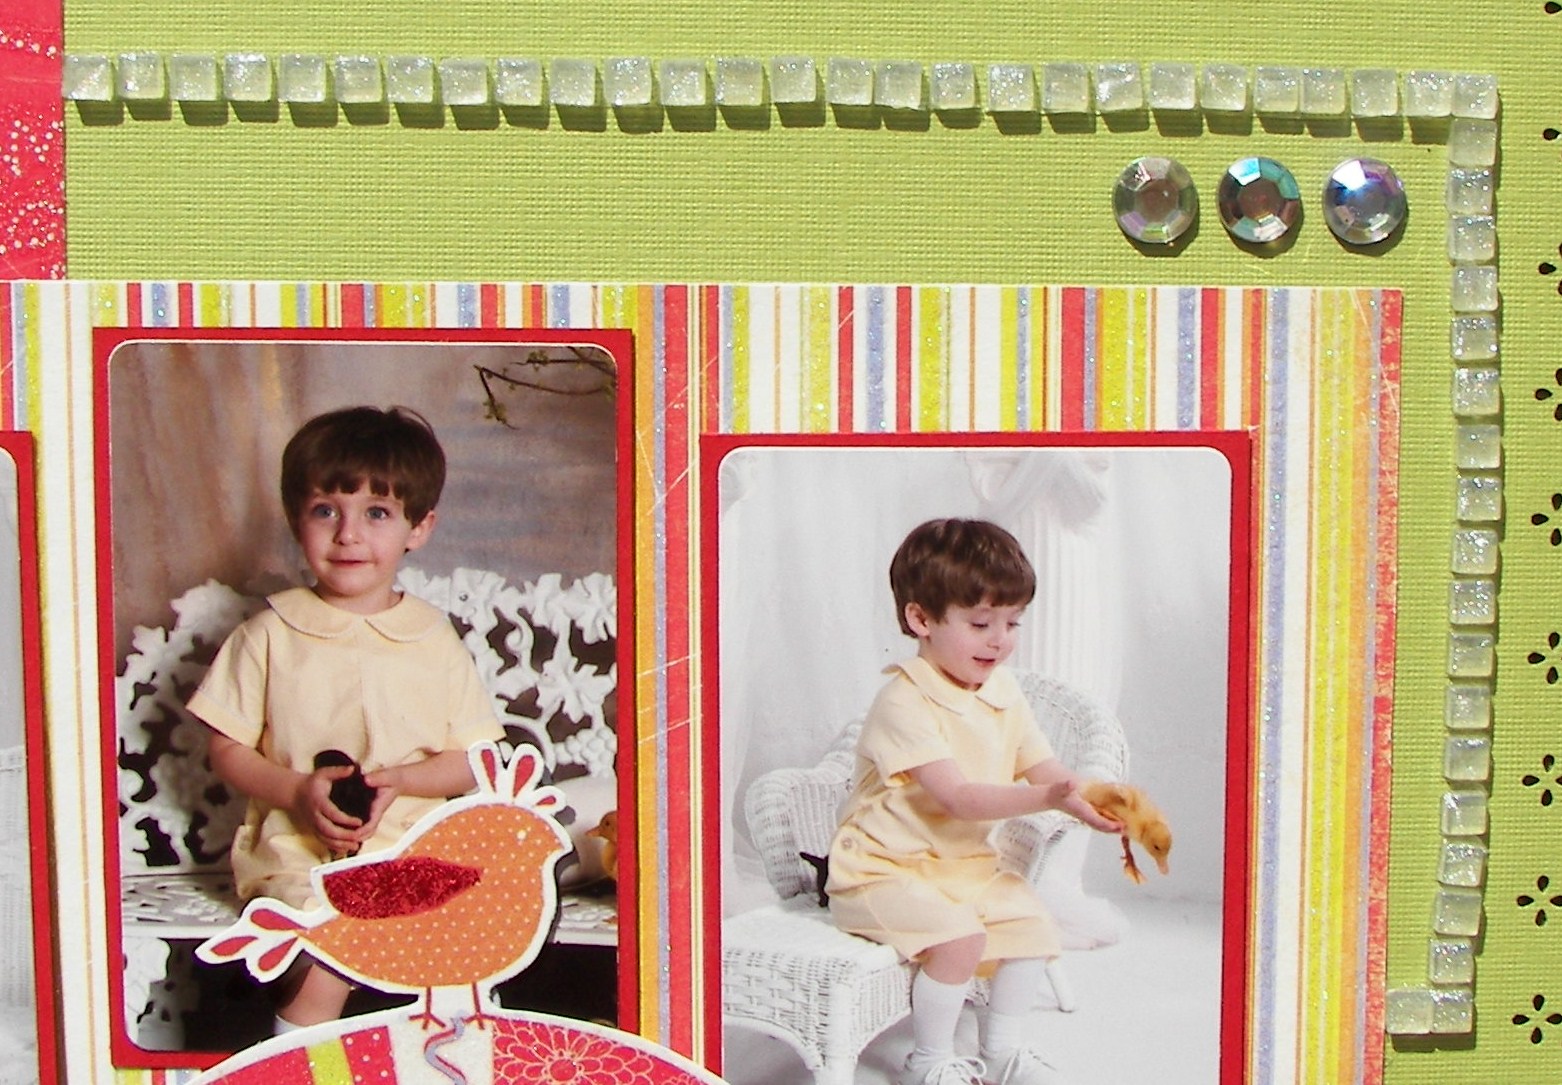
My project was cut with my Cricut and my Gypsy. I used the 'Tags, Bags, Boxes, & More' & 'Indie Art' cartridges on this one. The box is a window box from the TBBM cartridge and I welded the butterfly from IA into the window. This paper is from K & Company. I used a mixture of Helmar Quick Fix Adhesive Runner and Helmar 450 Quick Dry to adhere everything together. I also brought in some bling and some ribbon. This box holds 12 note cards. Here it is:
 I added lots of dimension through several butterflies on the front...
 The side of the box so you can see the cards. I alternated between cream, brown, and yellow cards.
 Here are what the note cards look like:
 Also, yall know how I LOVE to cook, bake, etc, right?! Well I made some goodies to take to our family get together tonight wanted to share my lemon bundt cake with ya. I used a Paula Deen Recipe for this one. It is a recipe for these tasty little muffins called "Lemon Blossoms," but I made the recipe into a bundt cake instead of muffins. This recipe is delicious!!! If you would like to try it, HERE is the link to the recipe....(note: if you want to bake this in a bundt pan, the cooking time will vary from the recipe. I baked mine according to the directions on the back of the cake mix box.)
 YUM! Can't wait to dig in!
Ok, that's all for me today. Brandon and I are making the 12 hour drive back up to our home in PA tomorrow! It's a killer of a drive, but I am ready to be back home! I have really enjoyed time spent with family, but I'm ready to get back to my own bed and my own scrappy space. So, I'll see ya in a few days!

Scrappy hugs! Thanks for stoppin' by!
Pin It!

Tuesday, January 25, 2011

Another Note Card Gift Set

Hey y'all! Happy Tuesday! I hope you are having a fabulous week so far! I wanted to share another note card gift set with you today. Y'all know me...I seem to get on these crafty streaks every now and then of creating the same type of project and this week it's these little note card gift sets. I made this one for a friend. I added her initial, which is 'T' to the front of the box and to some simple note cards inside. I used my Cricut Expression, Cricut Gypsy and the 'Tags, Bags, Boxes, & More' cartridge for this project. I cut the initials out using my SCAL (Sure Cuts A Lot) Software. This font is called 'Ballpark Weiner'...tee hee, love that name! I chose patterned paper from K & Company. I also added in some gold bling, lace, and a 3-D flower. Of course, I pulled out my favorite Helmar Adhesives to put my project together. For this project, I used: Helmar Liquid Scrap Dots, Helmar Premium Craft Glue, and the Helmar Quick Fix Adhesive Runner. I pulled this whole project together in a few hours. I hope my friend will enjoy this. In her profession, I thought she might need the occasional note card to send out.
 Here are the cards inside. Once again, I mixed up my colors of cards for that extra pop of color inside.
 This holds 12 cards, 4 designs.

Card #1
 Card #2
 Card #3
 Card #4
I'd like to tell you that you won't have to look at another one of these again, but I already have another one (maybe 2) in the works! LOL! I can't help myself! They are so fun and I love to give them to my family/friends as gifts! So I'll see ya tomorrow or later in the week with another one! :)

Have a fabulous evening! Thanks for stopping by my blog!
Happy Scrappin'!!!
Pin It!

Monday, January 24, 2011

Give A Hoot!!!

Howdy! Happy Monday all! I hope you are having a fabulous day so far! I have a new post going up on the She's A Sassy Lady blog today and I wanted to share some pix here with you as well. If you would like to check out the details on this project, go HERE to check out the Sassy blog.

I created this gift box filled with cards as a gift for my Mom. I used my Cricut, Gypsy, and the following cartridges:
1. Tags, Bags, Boxes, & More
2. Accent Essentials
3. Hoot N' Holler
 There are 14 cards inside, all tucked in safely and held with ribbon.
 Dimension on the box 6.5" x 4" and 1" deep.
As always, thanks for visiting my blog! Have a great week!
Scrappy Hugs!
Pin It!

Sunday, January 23, 2011

Custom Ordered Canvasas

Hey y'all! How are ya?! I hope you all had a fabulous weekend! I had a wonderful weekend! My family got together to eat some goodies and play cards on Saturday night (which was such a hoot!) and then I got to scrap all day today (I will share that with ya tomorrow). It was a great weekend!

I wanted to hop online right quick tonite to share a couple of projects with you. I created these this past week, but didn't snap pix until today. Anyways, yall know I've been on a canvas craze, right? Well I was asked by my good friend, Tara, to create some canvases for her.

First up, Tara requested a canvas for her sweet little girl, Olivia. Tara wanted something in pink and lime green. She also said she'd like something girly. Well, this was right up my alley so I got to work on this one first and I am SOOO pleased with how this one turned out! It is just so girly girl and so me! I so hope she'll like it. I tried to make it cutesy, but also make it something that could grow with Olivia as she gets older. I started by painting the canvas lime green. It took 4 coats of paint to get it completely coated. After the paint had dried, I cut the chandelier from the Cricut 'Home Decor' cartridge in a green polka dot patterned paper. I shadowed it in pink. I then cut the name 'Olivia' out of some pink/white zebra patterned paper and shadowed it in pink. I cut it out using a font called "Lauren Script' using my Cricut and SCAL (Sure Cuts A Lot) software. I cut out various sizes of circles in the pink zebra patterned paper to add next. After I had everything adhered down, I sealed the canvas to protect it. I used 4 coats. After my sealant had dried thoroughly, I added some yummy bling through rhinestones and peals. Then came time for the part I think I was most excited about....the hanging part. I usually use ribbon for these, but while shopping for this project, I found the CUTEST hot pink fur trim! I just knew I had use it and I love the way it turned out! I also added in a bit of pink zebra print ribbon. Here is what the final canvas looks like:
(click on the pic to bring it up bigger if you'd like)
 Up close of the chandelier...
 Again, love love love me some fur trim!!!
 Second up, a canvas for Tara. She is an elementary school teacher and asked me to create a canvas for her classroom. Tara asked for something with primary colors, bold, and vivid. She did not want anything school related. She is super organized, so I knew I wanted something with clean lines. So here is what I came up with....
I started by painting the canvas a blue color. I went over the blue with a little bit of watered down white paint to give it a white washed effect. I then chose some patterned paper from My Mind's Eye that had the cutest bird on it. The bird has primary colors in it, but also has some other colors. Tara teaches 2nd grade and I thought the children might like the bird.  I then cut out a banner using my SCAL software. I put her last name on the banner and 'Mrs.' above the banner. I cut the 'Mrs.' out in a font called 'Curlz' and the last name in 'Arial Bold.' After adhering everything down, I added 4 coats of sealant and then added some bling through the use of blue and red rhinestones. I then chose to add some green/white polka dotted ribbon to act as a hanger. To me, this canvas just reminds me of my friend Tara. I really hope she'll like it!!!!
(click on the pic to see it bigger)
 Isn't this the cutest bird?!!!
 Up close of her name:
So that is what I was up to this past week. I can't wait to give these to Tara. They are SOOO much cuter in person and I hope she'll just love 'em! My fingers are crossed!

Y'all have a great evening!
Happy Scrappin'!
Pin It!

Tuesday, January 18, 2011

Wanted To Share A Gift I Received...

Hey yall! I hope you are having a fabulous day! I have been meaning to share this with you for some time, but just kept on forgetting to snap pix! LOL. I received the CUTEST Alabama football themed pitcher and glasses from my Mom for Christmas! I cannot wait to display these in my home come next football season! She purchased high quality glasses and pitcher at a local store and brought them home to bling them up. She used houndstooth patterned, red, and white vinyl to decorate these. On the pitcher, one side has the Alabama 'A' and the other says 'Roll Tide.' Then she added dots in various sizes on the glasses and the pitcher. I have seen these at flea markets, but nothing near as cute as the one's she gave my husband and I for Christmas! Now, how CUTE are these?!!! I LOVE THEM!!!

(I apologize for this pic quality. It's raining outside here today and the best I could get taking them inside. If you want to see it better, click on the pic to make it bigger.)
So a big thank you to my BFF, my Mom, Carol! These rock girlfriend and I will definitely put these to good use!

Happy Scrappin' All! 
Pin It!

Heads Up My Fellow Scrappers!

Hey yall! Happy Tuesday! I don't know how many of you are interested in trying out for a scrapbooking design team, but I wanted to share this link with you. I myself am cutting back. I just have so many other things going on in my life right now and I want to re-prioritize, focus on other things for a while.  I'm in serious need of change. I'm not going to quit scrappin', just want to scrap more for myself and because I enjoy it. BUT being on a scrappy DT is sooo much fun! If you've never tried out for one or are looking for a new one, check this one out from Scraptastic!!! Go HERE. Good luck to all who apply!!!

I'm working on 2 more canvases this week, a special order from a close friend! I'm so excited! I hope I can make her some super cute ones! I'll be sure to share with yall too! Hugs!

Happy Scrappin'!
Pin It!

Sunday, January 16, 2011

Helmar Inspires A Canvas Craze!!!!

Hey yall! Happy Sunday! I hope you have had a fabulous week this week! I have a new post going up on the Helmar Blog today and I wanted to share my projects with you here as well! If you would like to check out the post on the Helmar blog that tells more about these projects, go HERE.

We were snowed in this week in Alabama and I went on a canvas craze! I created each of these using some of my favorite Helmar Adhesives. Here is what I came up with:

This canvas is for my scrappy studio. I included my favorite colors, patterns, my initials, and a southernbelle silhouette.
(You can click on these pix to make them bigger if you want, then just hit the back button to get back to this post.)
 I used my Cricut to cut out a lot of the elements on this canvas. The flowers are from Home Decor'. I cut the lettering, frames, and silhouette out using my SCAL software. The brown on the right hand side is patterned paper that I cut out. I hand painted the background.
 Second up, a canvas for someone special...my SIL! I hope she will like it! Their last name is 'Fretwell' and I thought this would look nice in their home or on the front door. I hand painted the background on this one as well.
 Chandelier from Home Decor'. I added some rhinestones for some bling. The chandelier and lettering are vinyl.
 Lettering cut using SCAL software.
 This canvas is for my Mom's classroom at school.
 Lettering cut from SCAL software as well.
Last, a very simple canvas designed by my nephew Carter. He wanted his to have his name in the middle cut out using a Lego font. His bedroom at home is in a Lego theme. I wish yall could see it. For Christmas, he got new bunk beds and my Mom had a local artist come in and paint his walls. She painted the scenes from all of the Lego video games (Lego Indiana Jones, Lego Star Wars, Lego Batman) and lego pieces on his walls...it is simply adorable!!! Carter then wanted circles all around his name, so that is what we did. I used vinyl for his name and for the dots. I cut the name using SCAL software and the dots using Plantin' Schoolbook. 
This was my first experience with canvas. I just loved it and can't wait to do more! It is so nice to take a blank slate and make a gift you can be proud of.

As always, thanks for stopping by my blog! Have a fabulous day!

Happy Scrappin'!
Pin It!

Saturday, January 15, 2011

Happy Saturday!

Hey guys! Happy Saturday! How was your week? I am still in Alabama visiting my family and it has been quite a week. We got a big snow storm and can you believe that my Mom's school (she teaches 5th grade) was out all week?!!! That is like unheard of in Alabama. Since I live in Pennsylvania, I am used to the snow, but they were not prepared for it down here. All the streets in our town closed, as well as most businesses. We had a ball playing in the snow! But when we weren't channeling our inner snow bunnies, Mom and I got down to some serious crafty business. I created 4 projects, which I will be sharing with you tomorrow. But in the meantime, I wanted to share the projects my Mom created this week with you guys. So all of these are her work, not mine. She is quite the scrapper!

First, look at this adorable canvas she painted for her front door here at the house. She hand painted the background. The snowman on the left is a file from My Scrap Chick that she cut using her Cricut and SCAL (Sure Cuts A Lot) software. The 'F' on the right stands for her last name, which is 'Fretwell.'
 Isn't it adorable?! I love her snowman!
 Next up, she used vinyl to create this cute sign as a gift. I love the lime green and hot pink with the zebra print! Too cute Mom!
 Next, my Mom creates these little altered wooden letters for people that she works with. All of the teachers at her school have these hanging outside their room and it is just adorable! She personalizes all of them with their name and a theme of their choice. Here are 3 she created this week:

On this one, the turtle house is a file from 'Treasure Box Designs.' The turtle is from the Create A Critter Cartridge.
 The frog on this one is also from 'Treasure Box Designs.' We love their svg's!
 This elephant is a svg file from 'My Scrap Chick.' We tweaked it to make it into the Alabama football mascot, Big Al.
I think the Alabama one is my favorite! I love the Alabama football theme! Roll Tide Roll! :)

See ya tomorrow! Have a great evening!

Happy Scrappin'!
Pin It!

Friday, January 7, 2011

Happy Friday!!!

Hey yall! TGIF! The weekend is here! Woot Woot!!! Nothing special planned for this weekend, but I am so glad it is here! Mom and I hope to scrap and chill! That sounds like super fun to me!

I scrapped here and there the past few days and thought I'd share my projects with all of you. So here we go...

"Dad" Card
I created this card to give to my father for Father's Day this year. I tried something I've never done...origami folding. I saw this online while surfing. It was a video on YouTube and looked pretty easy, so I gave it a try. It really was fun! This is super simple, but I hope he will like it.

Supplies Used:
Cardstock: The Paper Studio
Patterned Paper: My Mind's Eye
Rhinestones: Glitz
Brads: Spare Parts
Stickers: Making Memories
 "Debonair"
This layout is of my nephew, Carter. This was his first school portrait made last year at pre school. He is such a handsome little man, even if he is ours! He looks more and more like his Daddy every day to me.  LOL

Supplies Used:
Cardstock: The Paper Studio
Patterned Paper: My Mind's Eye
Rhinestones: Queen & Co, The Paper Studio
Glitter Glue: Ranger Industries
Electronic Die Cutting Machine, Cartridges: Cricut (Provo Craft)
Electronic Die Cutting Software: Sure Cuts A Lot (Craft Edge)
 "Spring Has Sprung" Card
This is another little card I threw together one afternoon.

Supplies Used:
Pre Printed Card Base, Cardstock, Butterfly Sticker, Rhinestones: The Paper Studio
Patterned Paper: My Mind's Eye
Brads: Spare Parts
Cardstock Sticker: Cosmo Cricket
Ribbon: Ribbon FX
Border Punch: Fiskars
Have a fabulous weekend!!! And thank you for stopping by my blog!

Happy Scrappin'!
Pin It!

Tuesday, January 4, 2011

Scrappin' With My BFF

Hey guys! How are ya on this chilly Tuesday?! I hope you are having a great week! I wanted to hop online right quick and do a bit of blogging. As you know, I'm in Bama hangin' with my family. We are all having such a fun time! I am missing my hubby, but staying busy keeps my mind off of it. Mom and I sat down to scrap the other day and I wanted to share what we have accomplished. I created 2 layouts. Mom created an altered wooden letter and a little monogrammed book for her new student teacher. I do not have a picture of the letter, but believe me, it was adorable! You'll have to excuse these pix...they are not the best. I do not have access to my Photoshop here and have to use just basic Windows Photo Gallery to crop.

We had so much fun scrapping together, as always! Of course, I used all of her supplies. It is just too hard to bring my own when I fly. So while I'm home, I use her stuff and she keeps the projects I make. But I don't think she minds! :)

Here are the 2 layouts I created:

"Easter"
These are some of Carter's older Easter portraits, but definitely some of my favorite!!!

Supplies Used:
Cardstock, Butterfly Sticker: The Paper Studio
Patterned Paper: My Mind's Eye
Border Punch: Martha Stewart Crafts
Mosaic Tile Stickers: Mark Richards
Rhinestones: Studio 18
Ribbon: Ribbon FX (Hobby Lobby Stores, Inc.)
Electronic Cutting Machine, Cartridges: Cricut (Provo Craft)
Sketch: Liz Qualman
 This large flourish was cut from a piece of My Mind's Eye patterned paper. I adhered it with the Helmar Liquid Scrap Dots. It popped it up just a tad for some dimension.
I had originally planned to do a bit of stitching on this page. But then I found these cool mosaic tile stickers that my Mom had purchased from Hobby Lobby and decided to give them a try. I like the different look they give.  
 "Giddy Up"
This is another page of Carter. This was one of his pictures taken when he was around 2 or 3 I think. This is a very simple page. It took me about an hour to pull it together.

Supplies Used:
Cardstock, Brads: The Paper Studio
Patterned Paper: Sassafras Lass
Rhinestones: Studio 18
Ribbon, Fringe Trim: Ribbon FX (Hobby Lobby Stores, Inc.)
Alphabet: Cuttlebug (Provo Craft)
Electronic Cutter, Cartridges: Cricut (Provo Craft)
 This little horsey is a cut from the 'Create A Critter' cartridge. I added some fringe ribbon to mimic the horsey in the photograph.
 I tore some of the edges of the layout and added patterned paper scraps behind the tears for an extra pop.
 Now, check out this adorable little monogrammed book my Mom created! She has a new student teacher coming in this semester and is giving this to her as a gift. How cute is this?! I love it! She purchased the book at Hobby Lobby for $2.99 I think...can't beat that!!! She then used her Cricut/SCAL software to cut the 'M'. She added some bling and ribbon to the binding. Voila'! A super cute, personalized gift! Great job Mom!
That's all from us for today. I hope you all have a fabulous rest of your day! Thanks for visiting my blog!

Happy Scrappin'!
Pin It!

Monday, January 3, 2011

Happy Monday! Join in on the fun this week for the Helmar/Core'dinations Blog Swap!!!

Hey guys! Happy Monday! I hope your first week of 2011 is starting off to be a fabulous one! I have missed blogging and hope to get back in the groove starting today! I flew home to Alabama this past Thursday to spend a little time with my parents, kind of a mini vacation I guess. We moved into a new home in Pennsylvania, still in the same town but finally out of that teeny tiny apartment, and the moving process just about got the best of this belle! Brandon and I moved everything by ourselves, no help at all. All I have to say is that a dolly is a girls best friend when moving! LOL! We had an upstairs apartment and I bet Brandon and I both walked up and down those steps at least 200 times. I had muscles hurting that I didn't even know I had! But we finally got everything moved in 2 days and I started unpacking a bit before I flew in to AL. My scrappy studio is still completely boxed up, but I'll get on that as soon as I get back home. But in the meantime, Mom has plenty of stuff for us both to play with and that is exactly what we did last night. I completed 2 layouts and Mom worked on an altered letter for a fellow teacher. I will share our work with yall this week.

But, in the meantime, I wanted to give yall a heads up!!! The brands Helmar and Core'dinations are having a blog swap this week! Tons of inspiration and even some PRIZES to be had! These are 2 of my absolute favorite brands! The best adhesive with some awesome cardstock! If you have never picked up any Core'dinations cardstock, I highly recommend it. It is fabulous for scrapbooking! Of course, if you've never heard of it, check out their site HERE and see all the yummy goodness! Core'dinations cardstock is perfect for sanding, embossing, and so much more!

Go HERE to be taken directly to the Helmar blog to check out the design team's beautiful projects using these awesome products! There will be new projects going up all week, so be sure to visit as often as you can! :)

Here are a few projects I have created in the past that feature these fabulous products!

'Gallant'
 'Enlightenment'
 'Bee Mine'
 '4th of July'
(this card was a lift this past summer from another talented Helmar artist!)
 'Christmas In Dixie'
 'Pickin' Pumpkins'
 'By The Seashore'
 'Hi'
 'So Tweet'
 'Merry Christmas'
I hope you all have a fabulous day! Thanks for stopping by my blog!
Happy Scrappin'!
Pin It!