Hey y'all! Happy Friday and Happy July!!! Can you believe it is July?! I am so excited today though because it's my big brother's birthday!!! So a BIG shout out to my bro, Tyler, on his special day! I hope he has a fabulous birthday!!! I only wish I could be there to celebrate with him, but as always, he is in my thoughts. Have a wonderful day, Tyler! I love you!!!
Now, on to the scrappyness! I have been working all week on several projects and I just decided to share them all at once today. So here we go...
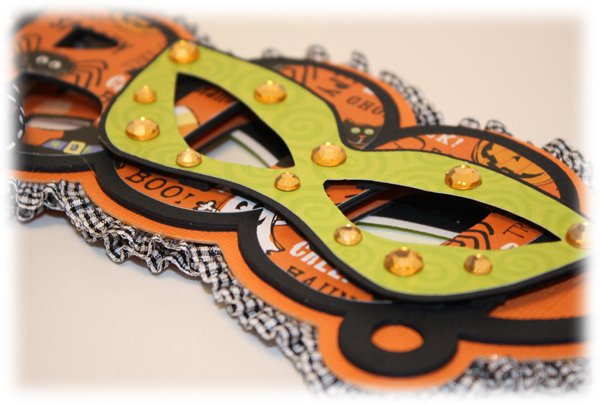
"Halloween Mask"
Supplies Used
Cardstock: The Paper Studio, Core'dinations
Patterned Paper: The Paper Studio (Green Swirls, Halloween Mix)
Ribbon: Decorative Trim (Hobby Lobby), Ribbon FX (Hobby Lobby)
Rhinestones: Studio 18
Electronic Cutter: Cricut (Provo Craft)
Electronic Cutter Software: Sure Cuts A Lot (Craft Edge)
SVG: SVG Cuts (this was a FREEBIE, find it
HERE)
Wooden Dowel: Hobby Lobby
Other: glue gun, glue sticks
I had SO MUCH FUN on this project! If you are a follower of my blog, you may remember I made one similar to this last year. Find it
HERE if you are interested in seeing it. However, last year, I pretty much made it as a decoration piece to display in my home during the Halloween holiday and not for actual use. I put squiggly eyes on it last year and I had many ask me 'well, how can you see through the mask?' LOL. So I thought, well I am going to tinker with the freebie from SVG Cuts and see if I can make it into a mask that one can hold up and look through. So after much tinkering, I figured it out and am so happy with this project. It is very sturdy and ready to be used with any cutesy Halloween costume.
I had to stand it up with the help of a decoration piece from my kitchen. I wanted to hold it up to my face and have someone snap a pic so you could see what it looks like in front of a face, but I was home alone and could not. But I think you can tell about it from this pic.
I cut my dowel down to 10 inches and wrapped ribbon around it to hide the wood. I also added a array of ribbons to the handle. I really waned to girly this up, y'all know me....LOL.
I have lots of dimension going on in this project. I popped the green mask part up using Zap Dots. To make the mask sturdy, I cut out the shadow of the word 'Boo' about 10 times and glued them on top of one another. This helped to provide a good base for my project. Here you can see all of that dimension...
(Also, I finished out the back of the mask exactly like the front. I wanted it to look nice on each side. But I forgot to snap a pic of the back. The black/white frilly trim on poking out on the edges of the front and back piece help to hide the wooden dowel.)
I just loved all this ribbon. I really like the black/orange/white combo. I got a sweet deal on all this ribbon at Hobby Lobby last week. They were having a HUGE 'The Paper Studio' (which is their brand of product) sale at the store. I got all these ribbons on spools for a buck a piece! I got like 12 spools of ribbon for $12!!! I was doing the happy dance all the way home....still am! LOL
"Holly Leaves" Christmas Card
Supplies Used
Pre-Cut Card Base: The Paper Studio
Cardstock: The Paper Studio, Sassafras
Patterned Paper: The Paper Studio
Decorative Scissors: Fiskars
Chipboard Stickers: American Crafts
Button: The Paper Studio
Die Cut: Jenni Bowlin Studio
Trim: Hobby Lobby
Pen: ZIG Memory System (Kuretake)
This is just a simple little Christmas card.
Up close view of die cut/button/stickers...
I did a bit if paper pleating with the brown cardstock. And check out this CUTE trim! Another Hobby Lobby Find! I attached this trim with 450 Quick Dry. I also applied a bit of Fray Stoppa to the ends of the trim to keep it from fraying.
"Thanksgiving Banner"
Supplies Used
Cardstock: The Paper Studio
Patterned Paper: Bella Blvd., Sassafras, The Paper Studio
Alphabet Stickers: Pink Paislee
I-Rock Tool, Rhinestones: Imaginisce
Pearls: Queen & Co
Brads: The Paper Studio
Ribbon: The Ribbon Boutique (Hobby Lobby)
Laminator/Laminating Pockets: Purple Cows
Electronic Cutter, Cartridge: Cricut (Provo Craft), Create A Critter
Software: Cricut Gypsy (Provo Craft)
Electronic Software: Sure Cuts A Lot
Here is a little banner I created to hang in my kitchen during the Thanksgiving holiday. I cut the banner pieces out using my Cricut and SCAL software. I created the SVG file for the pennant myself. If you would like to have it, shoot me an email at
aymee810@yahoo.com and I'll be happy to share. After cutting the pennant pieces and adhering them together, I decided to pull out my laminator and laminate them to keep them protected. I laminated them twice to make them really sturdy. After laminating, I strung the banner together using brads. I then added the turkeys and some ribbon.
I know you can't see it, but I took some more of that orange checkered ribbon and attached it in a loop behind these ribbon accents below. They will act as my hanging mechanism.
I popped the turkeys up for added dimension. The eyes of the turkeys are little rhinestones that I adhered using my I-Rock tool. You may also can see a bit of a sheen on this from the side view. It's the light outside hitting the laminating parts. It really made the banner shine.
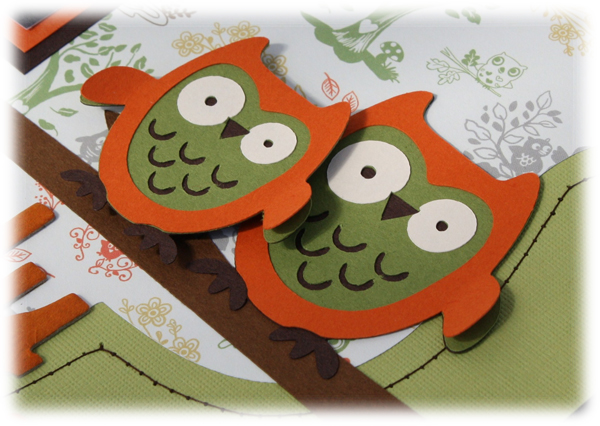
"Unbeleafably Cute"
Supplies Used
Cardstock: The Paper Studio
Patterned Paper: The Paper Studio (Woodland Friends, Brown & Cream Hounds Tooth, Thanksgiving Words)
Alphabet Stickers: American Crafts
Brads: The Paper Studio
Thread: Coats & Clark
Ink: Tim Holts (Ranger Industries), Spiced Marmalade
Ribbon: Ribbon FX (Hobby Lobby)
Rhinestones: The Paper Studio
Glitter Glue: Stickles (Ranger Industries)
Electronic Cutter: Cricut (Provo Craft)
Cartridges: Create A Critter, Hoot 'N Holler, Plantin' Schoolbook (Provo Craft)
This layout features my nephew Carter a few years ago during a fall photo shoot. I cut the medallion shaped paper in the background on my Cricut and using SCAL software. I made the file for the shape myself. If you'd like that, shoot me an email at
aymee810@yahoo.com and I'll share with ya! I then took my sewing machine and stitched around the shape. I then layered some more patterned papers and embellishments.
These alpha's were originally plain. I inked them with my Tim Holtz Distress Ink to give them a pop of color.
I wanted to frame my photos in the upper left hand corner so I used up some ribbon scraps.
I folded up their little wings a tad for some dimension.
Also, I wanted to share this layout again. I shared it a few days ago, but I had to go back and 'fix' it. LOL. I had the alphabet stickers for the words 'too cute' down a little low and the ribbon trim was hiding them. So I moved them up a tad...much better!
Whoo! My fingers are worn out! LOL! That was one long blog post, but I wanted to share. I hope you didn't mind reading so much. I really appreciate you stopping by my blog! I hope you'll be back again soon!
Have a wonderful, safe 4th of July with your friends and families! Happy Scrappin'!!!